Step 1: What exactly is the problem?
When we look at the Apache Flink documentation for the FileSystem connector's current limitations, the problem is laid out in plain English: when using the FileSource connector class for unbounded file sources, the enumerator keeps track of the paths of all files that have been processed. That state grows indefinitely over time, and it will eventually lead to performance issues. The more files your program processes, the larger the state grows, because Flink remembers every single file path it comes across.
Step 2: Can I actually see this happen?
I'm a visual learner and I work best by seeing the problem first. Before jumping into any solution, I want to reproduce this issue — watch the state grow and understand why it becomes a problem in production.
To do that, we need a program that uses FileSource with unbounded data: files that simply do not stop streaming in. Here's the plan:
- Set up a Flink job with FileSource in unbounded (continuous monitoring) mode with checkpointing enabled
- Write a script that rapidly generates small CSV files into the input directory, one every few milliseconds
- Run the job and observe the Flink UI to see the checkpoint state size climb over time
- Dig into specific parts of FileSource to determine whether we can add custom logging to watch the enumerator tracking processed files in real time
Flink Limitation Come to Life
The goal here is to understand how the current limitation in Apache Flink's FileSource data source works, how it happens, and why it is a problem. The example we'll see is a very basic one. I'm going to set up a Flink job with FileSource in unbounded (continuous monitoring) mode with checkpointing enabled.
Setting up Apache Flink
Getting Flink set up for this exercise is relatively easy. I'm using IntelliJ IDEA (the free version), and the Apache documentation helps to set up Flink with this IDE.
Pre-reqs
This is the link I used to get started: here (I jumped between Using Maven, Overview, and some of the other tabs that had to do with dependencies and formats).
1. Java 11. In order to use Apache Flink, you need to have Java 11 installed.
# Homebrew (if not already installed)
/bin/bash -c "$(curl -fsSL https://raw.githubusercontent.com/Homebrew/install/HEAD/install.sh)"

# brew update (if you have it installed but haven't updated it)
brew update

# Java
brew install openjdk@11
2. Maven is my build automation tool of choice, so I'll be using Maven >= 3.8.6.
# Maven
brew install maven
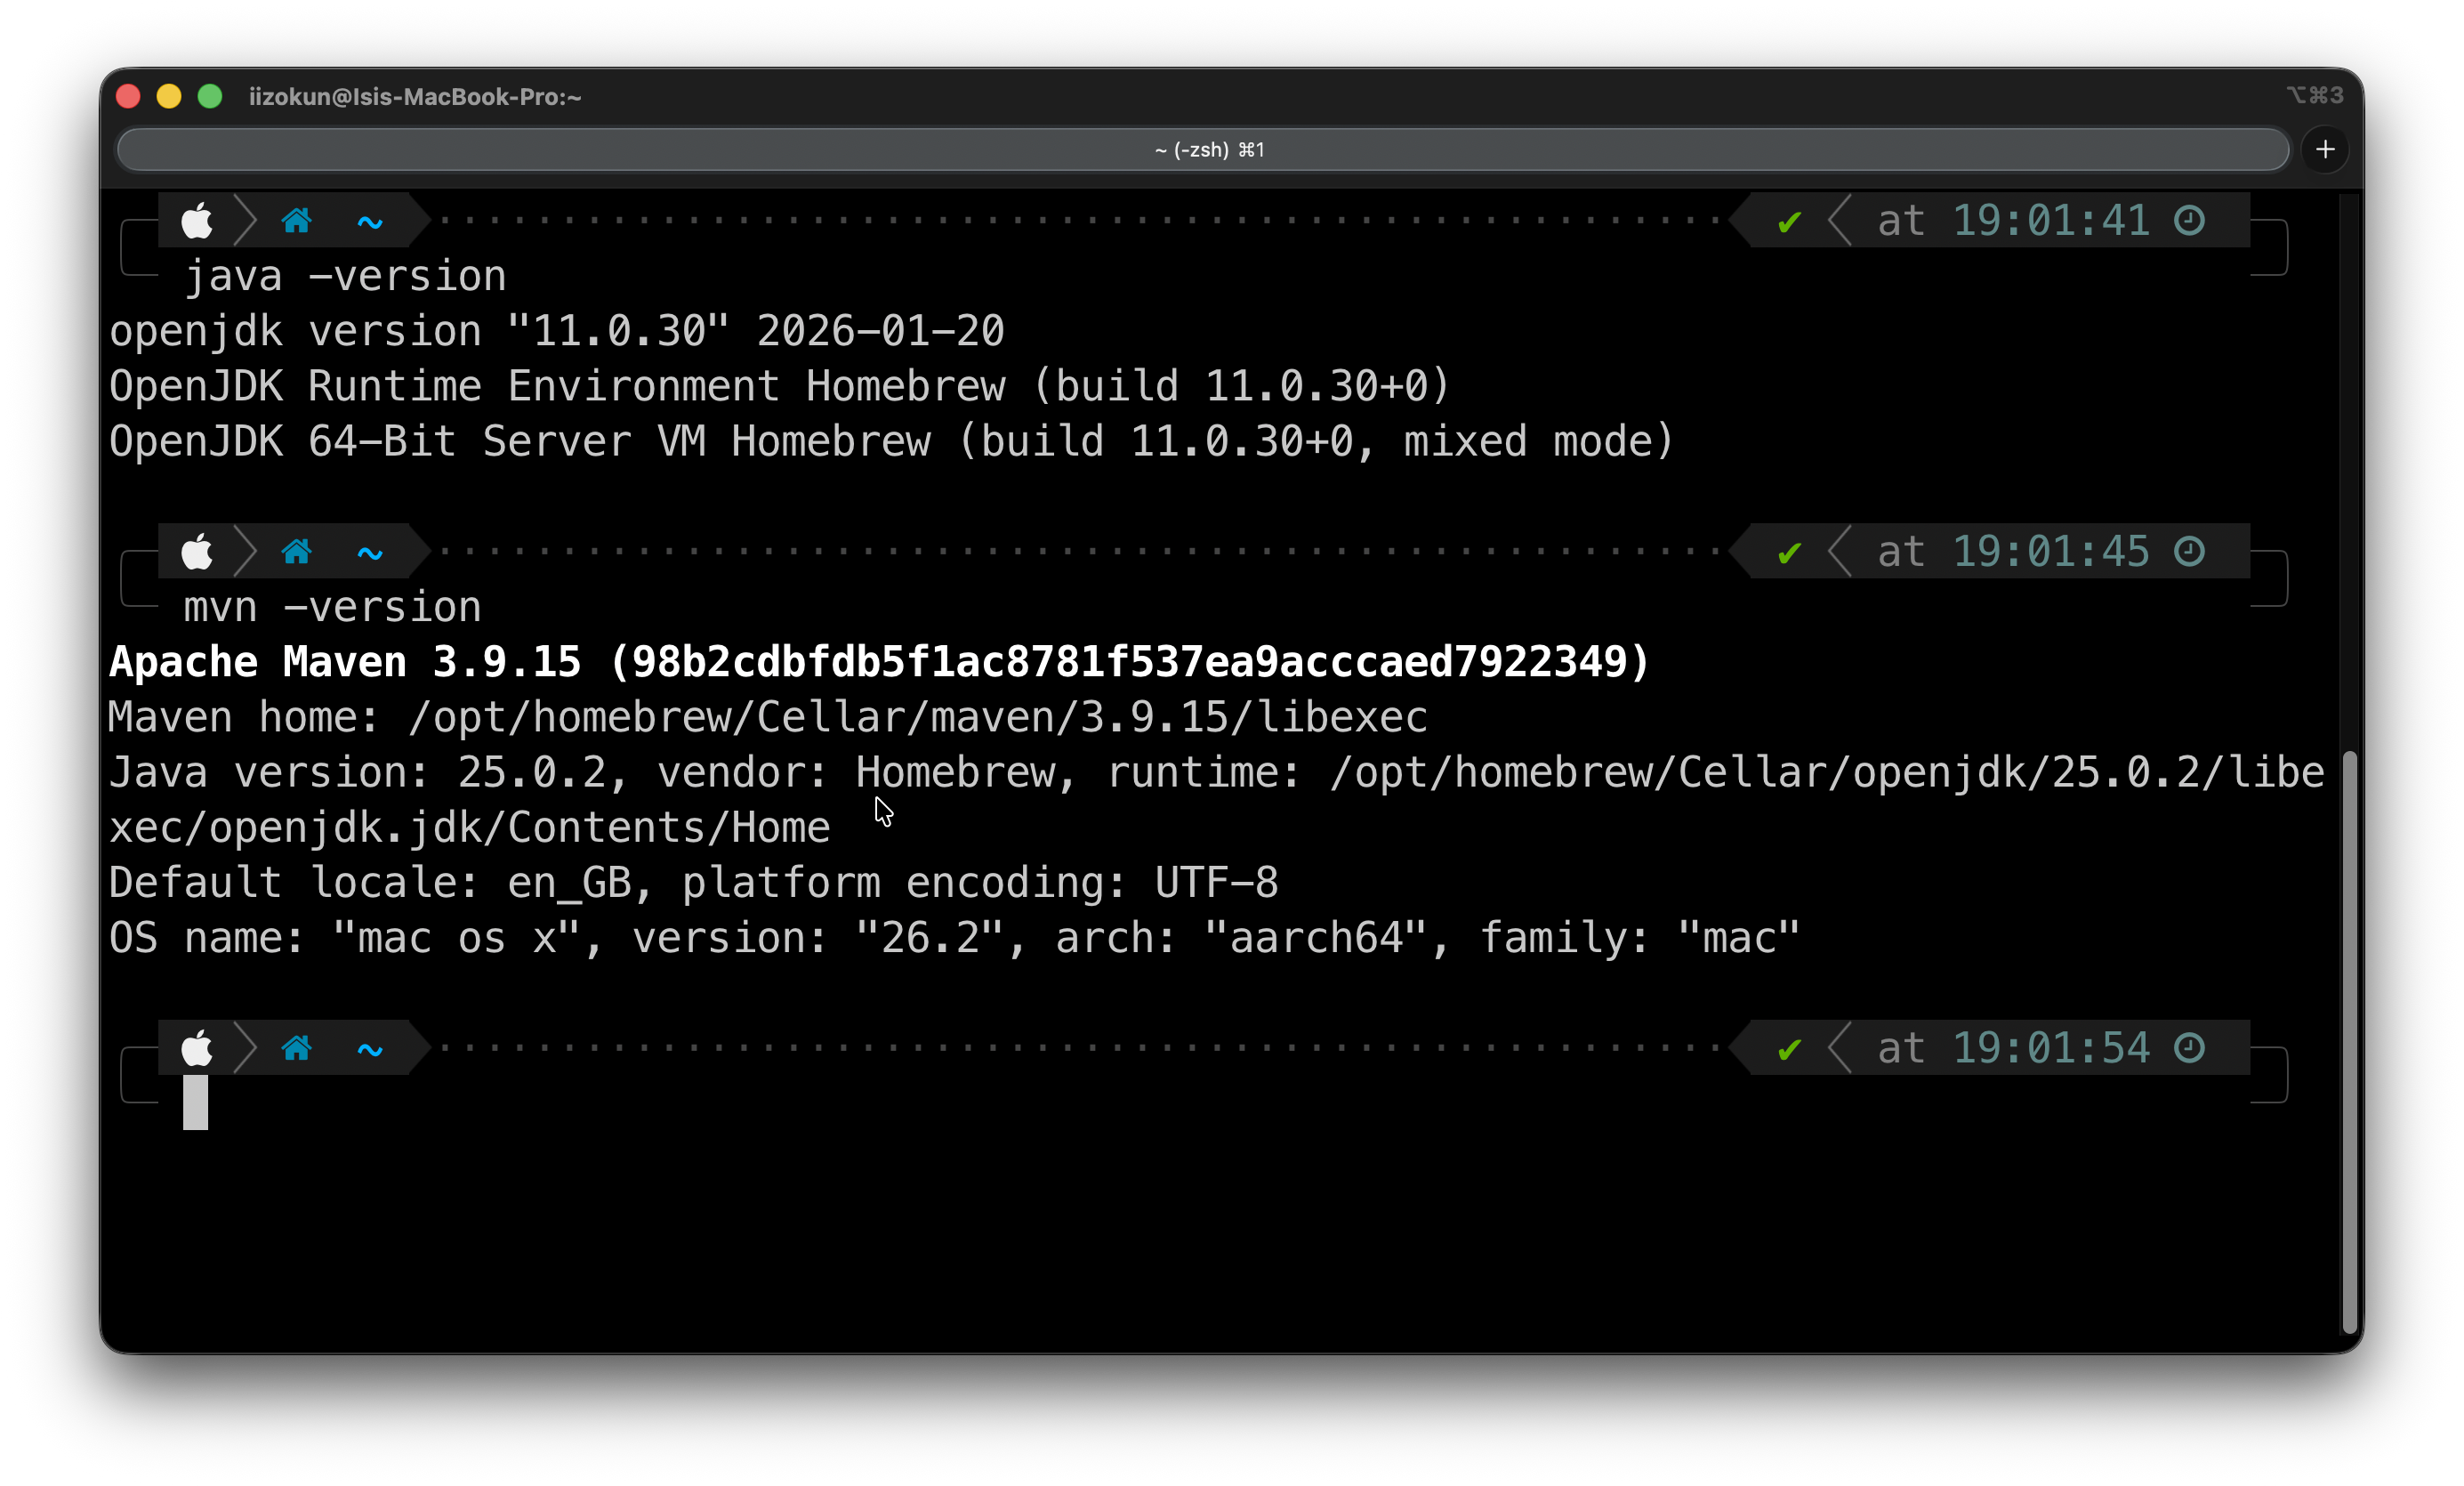
3. After both installs, you would need to check that they are on your local machine.
java -version
mvn -version
4. Now, download IntelliJ IDEA (or your IDE of choice) here.
Note: JetBrains used to have an IntelliJ IDEA Community Edition product, but they have now unified it. You download one type of product, and you can use the core functionality of Java and Kotlin for free. Of course, folks who want additional functionality can pay for it. For the purposes of Apache Flink and going through this process, that wouldn't be necessary.
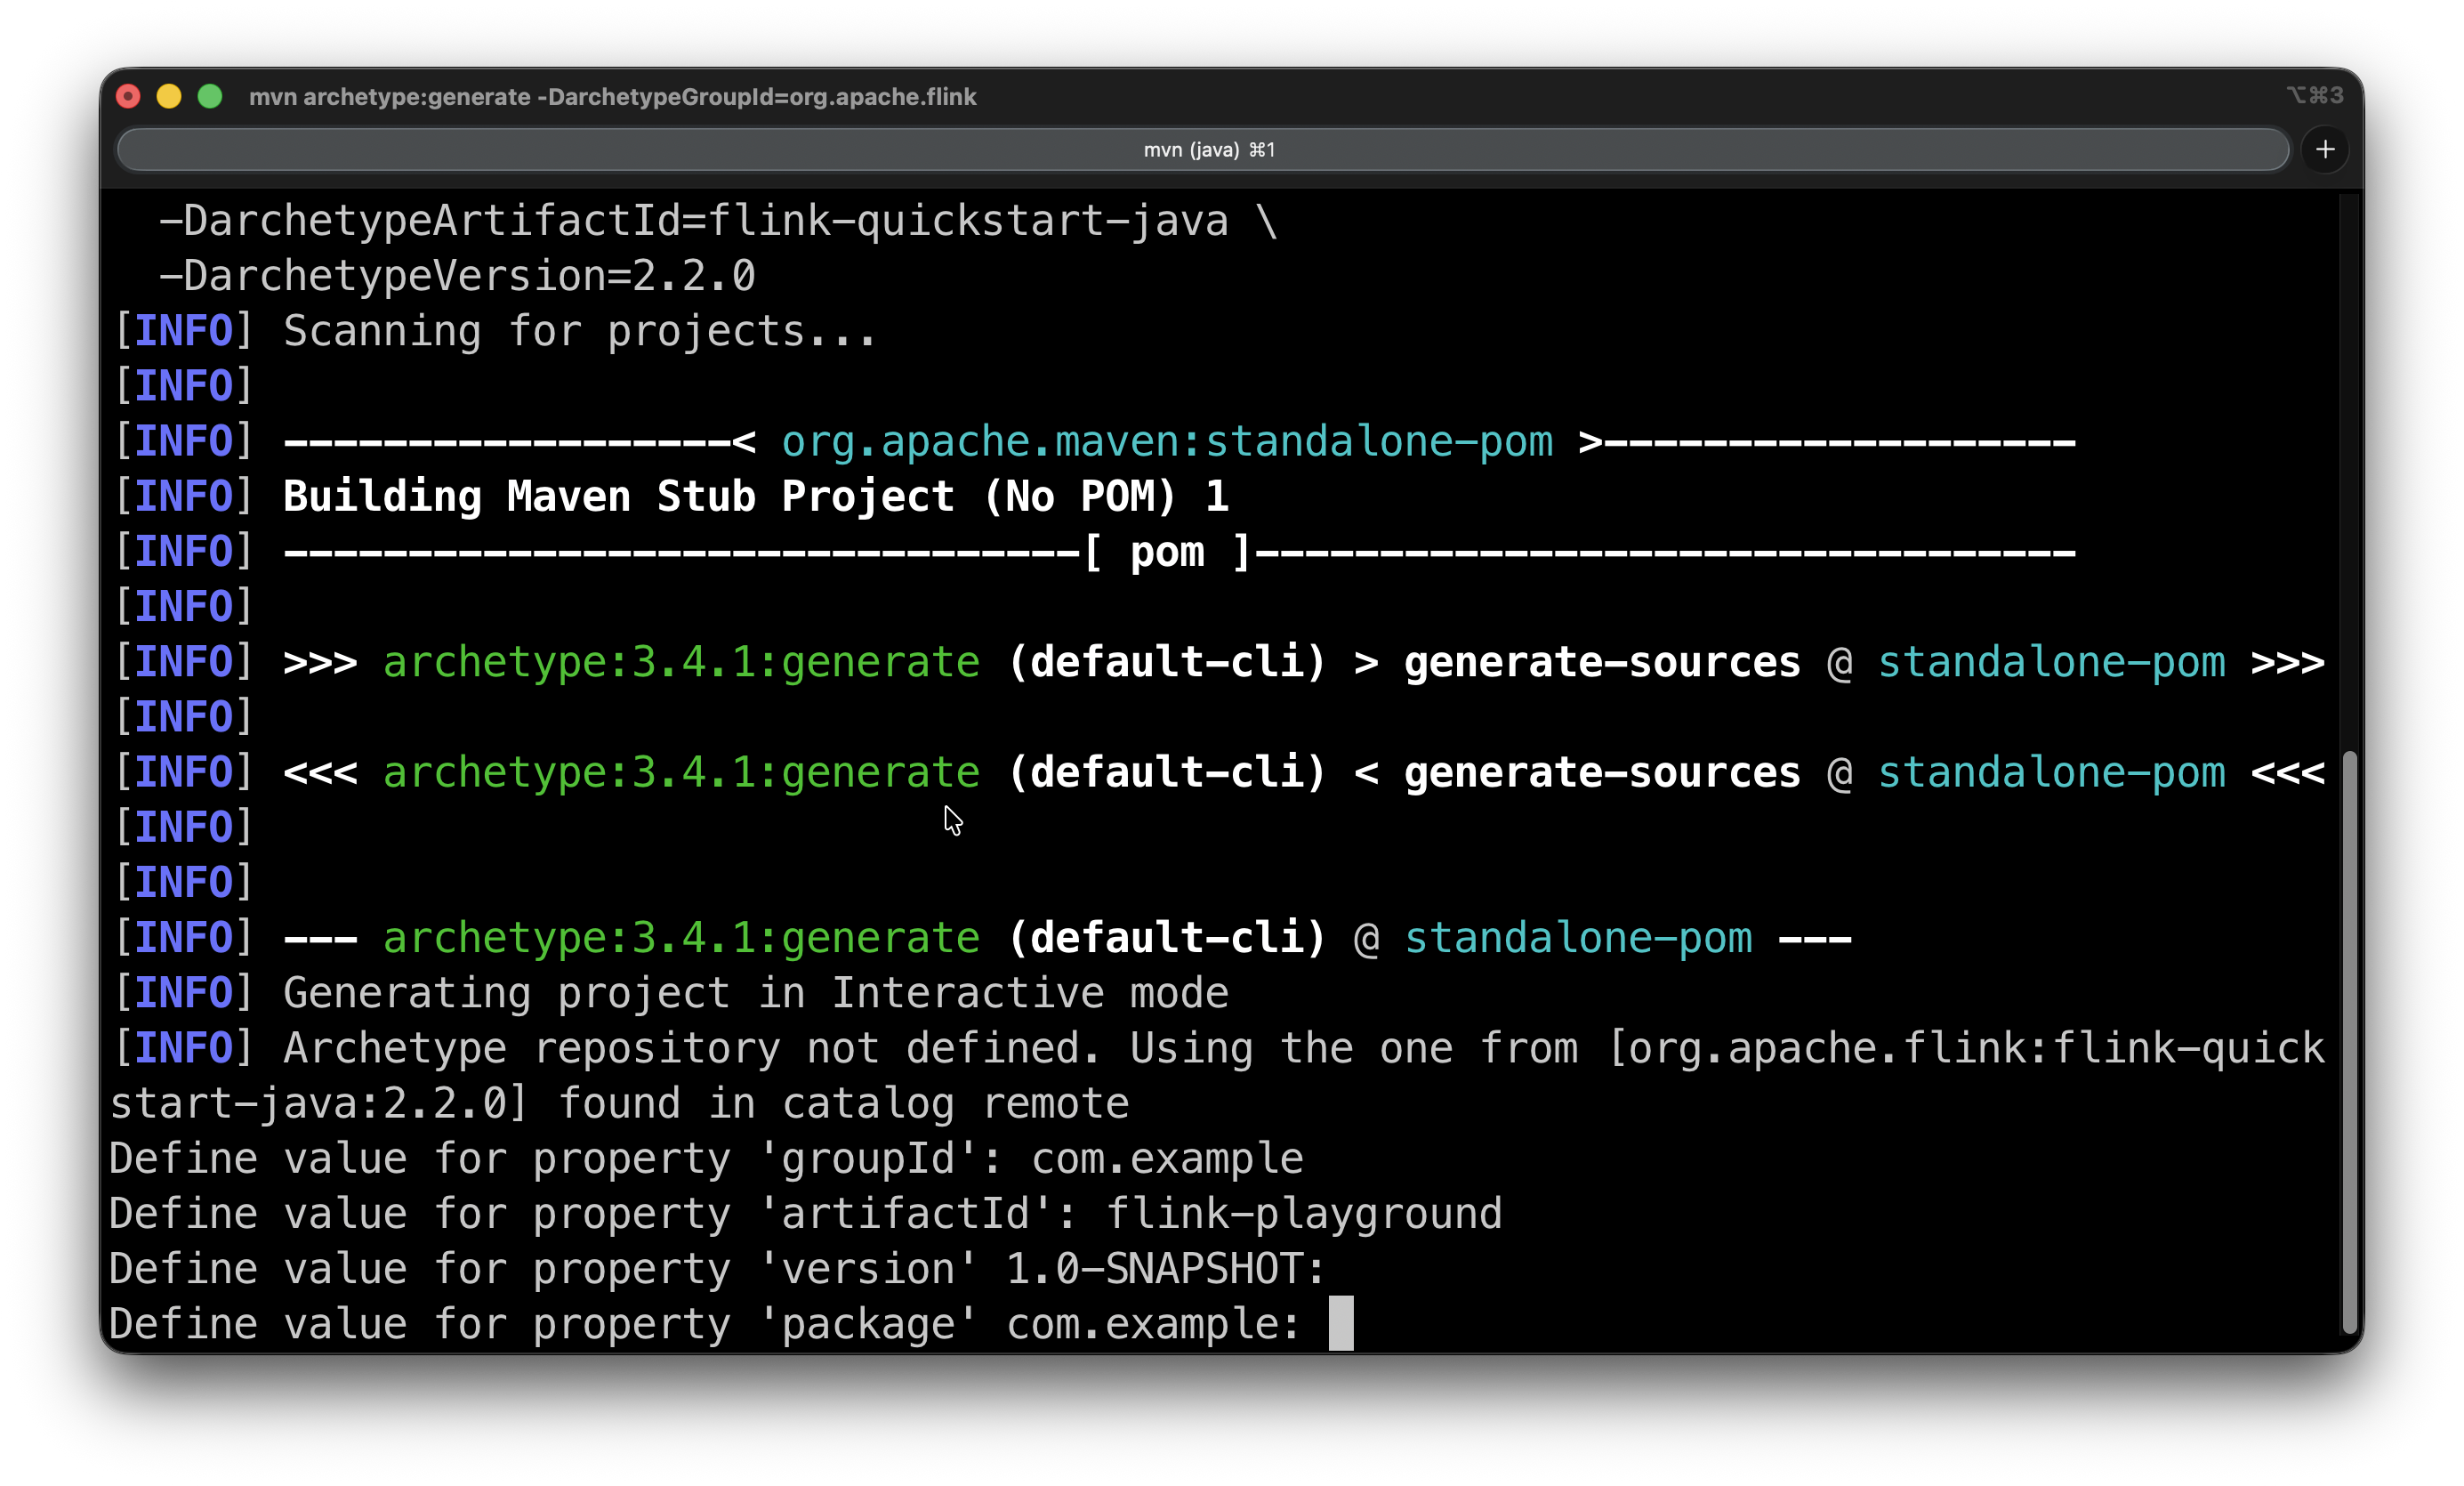
5. Create a project using the following archetype with the Maven command below. Enter it into your CLI.
mvn archetype:generate                \
  -DarchetypeGroupId=org.apache.flink   \
  -DarchetypeArtifactId=flink-quickstart-java \
  -DarchetypeVersion=2.2.0
You'll be prompted for the groupId, version, and package. The groupId and artifactId are up to you to select, but the version and package come with defaults that you can accept by pressing Enter. Then it will ask you to confirm with Y.
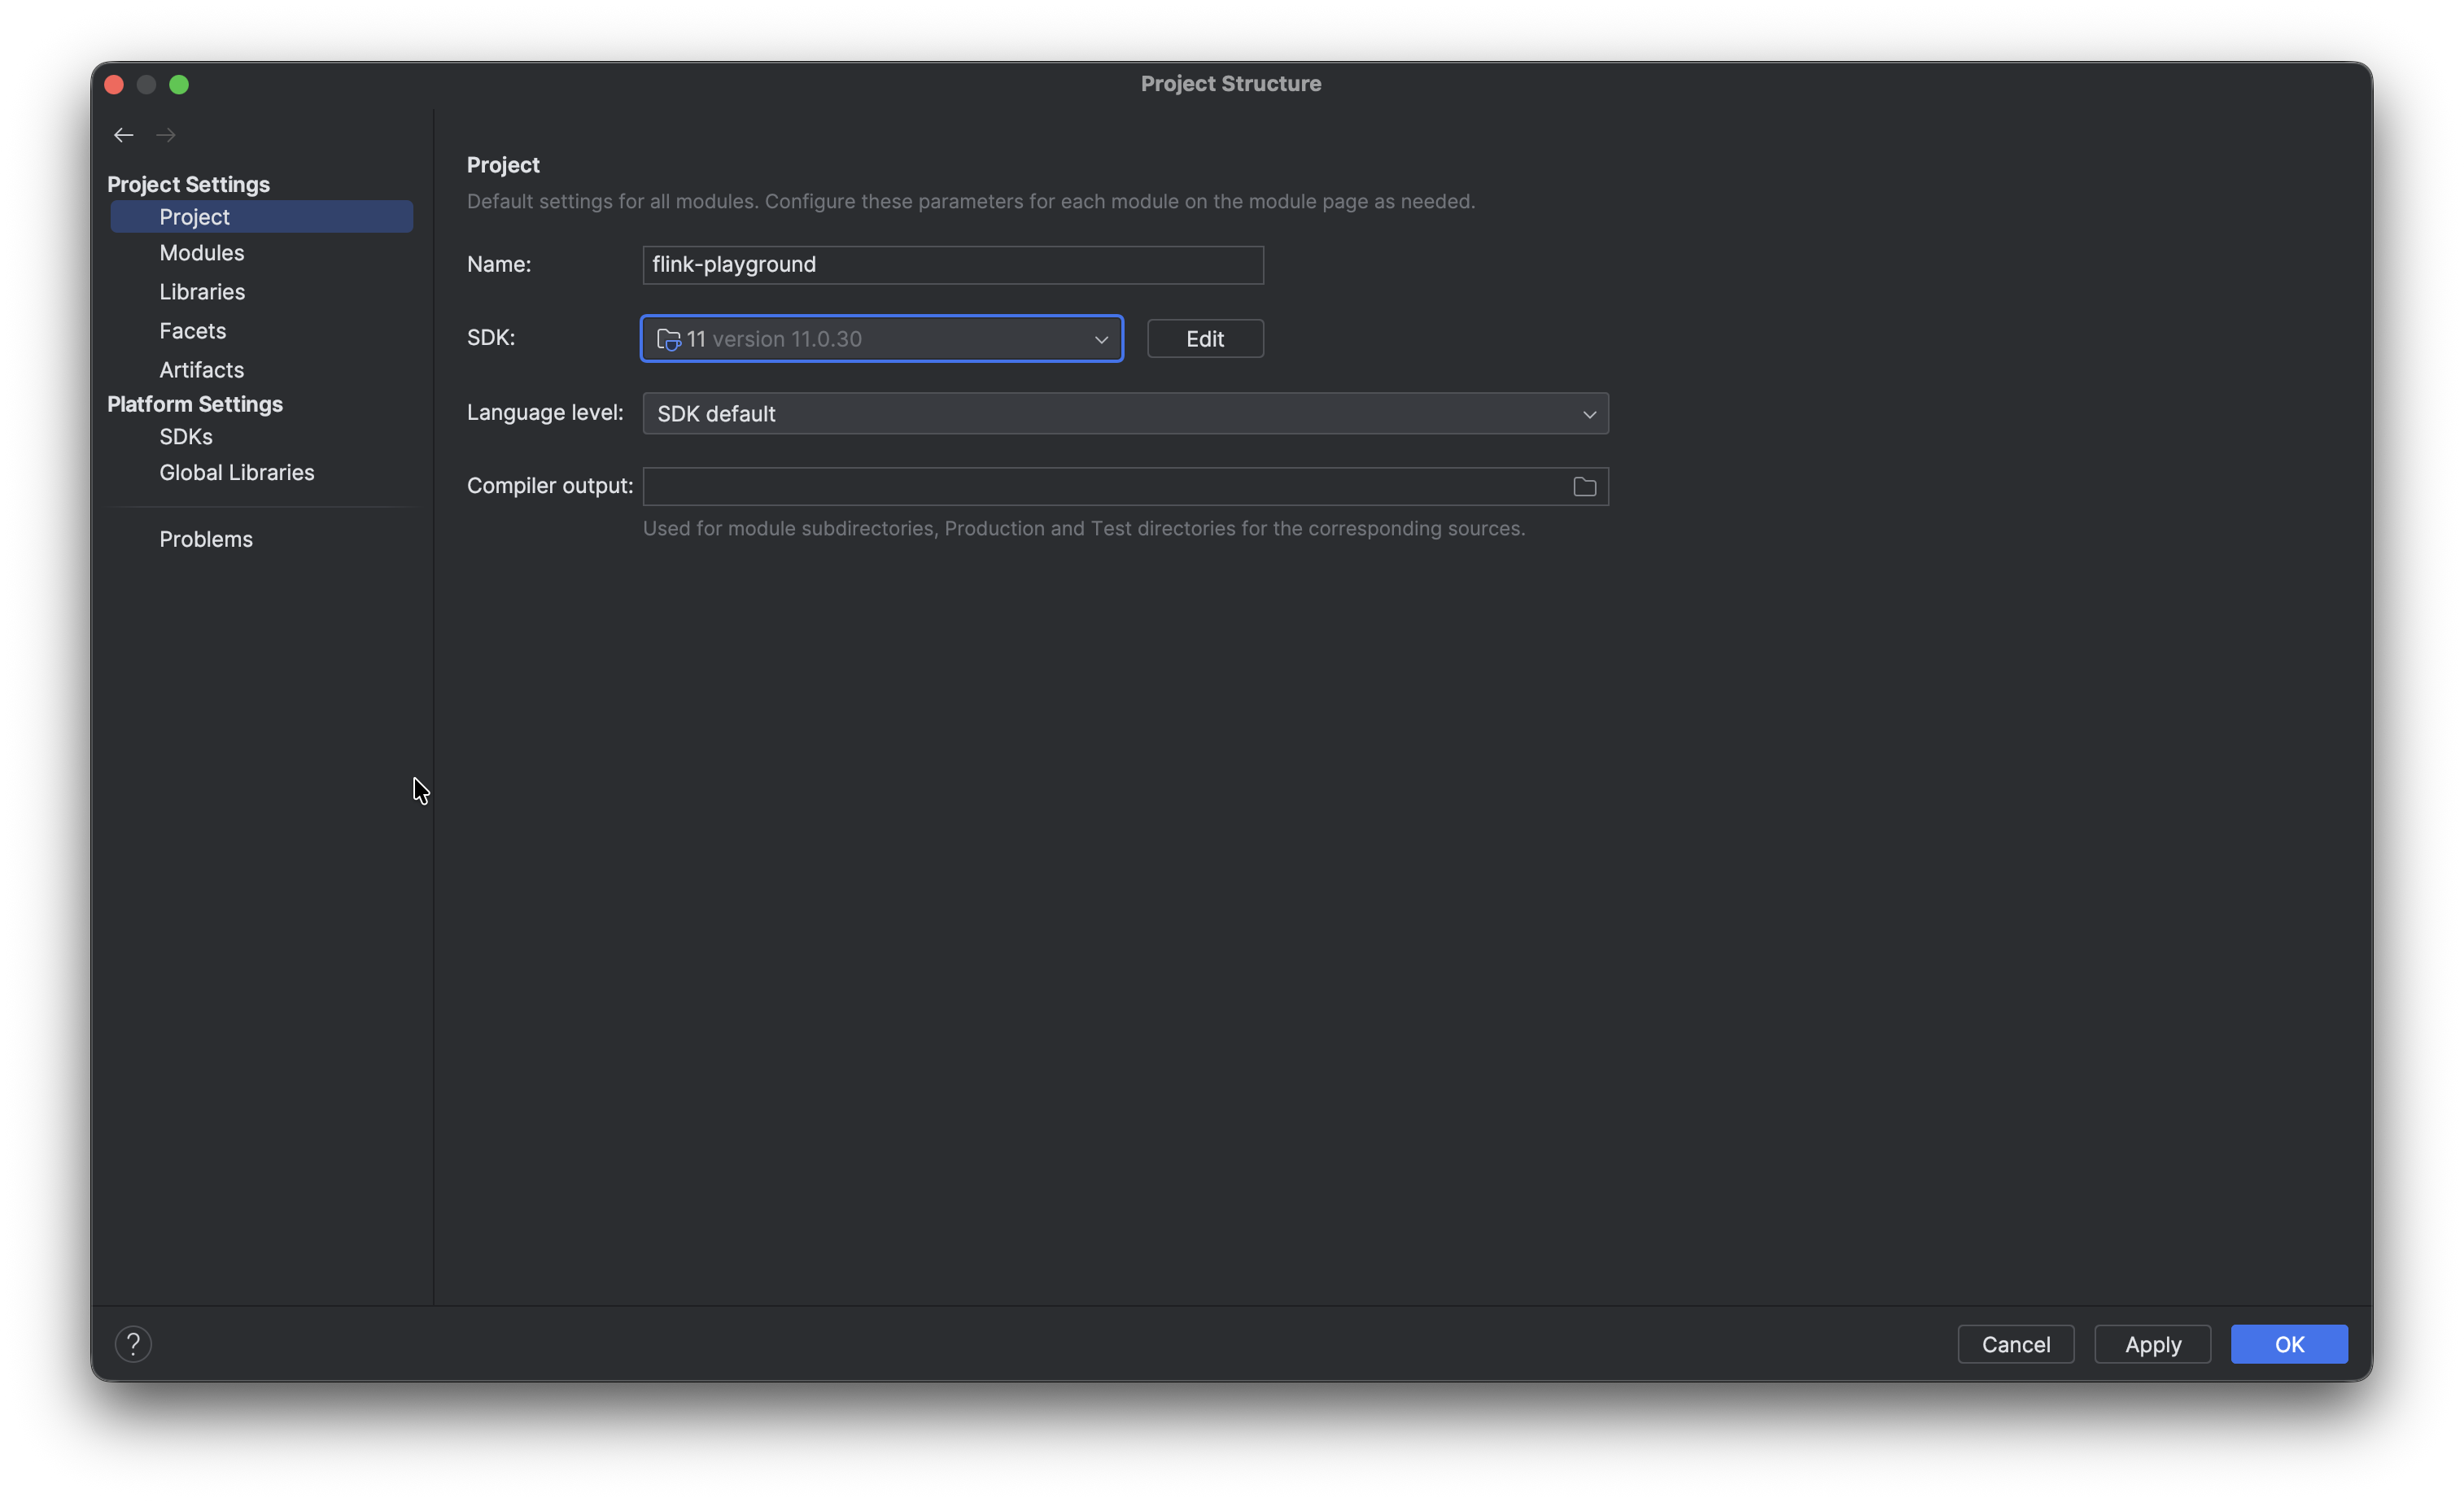
6. Open the project in IntelliJ and select the flink-playground folder (the one containing pom.xml). IntelliJ detects the Maven project automatically and starts downloading dependencies. You might have to give it a couple of minutes the first time.

While that runs, set the JDK by opening File → Project Structure → Project, set SDK to your installed JDK 11, and set Language level to match.
The cool thing is you actually can download the necessary JDK directly from this page by clicking SDK → Add SDK and then Download JDK.
7. The Flink documentation notes the following:
Note on IntelliJ: To make the applications run within IntelliJ IDEA, it is necessary to tick the Include dependencies with "Provided" scope box in the run configuration.
If this option is not available (possibly due to using an older IntelliJ IDEA version), then a workaround is to create a test that calls the application's main() method.
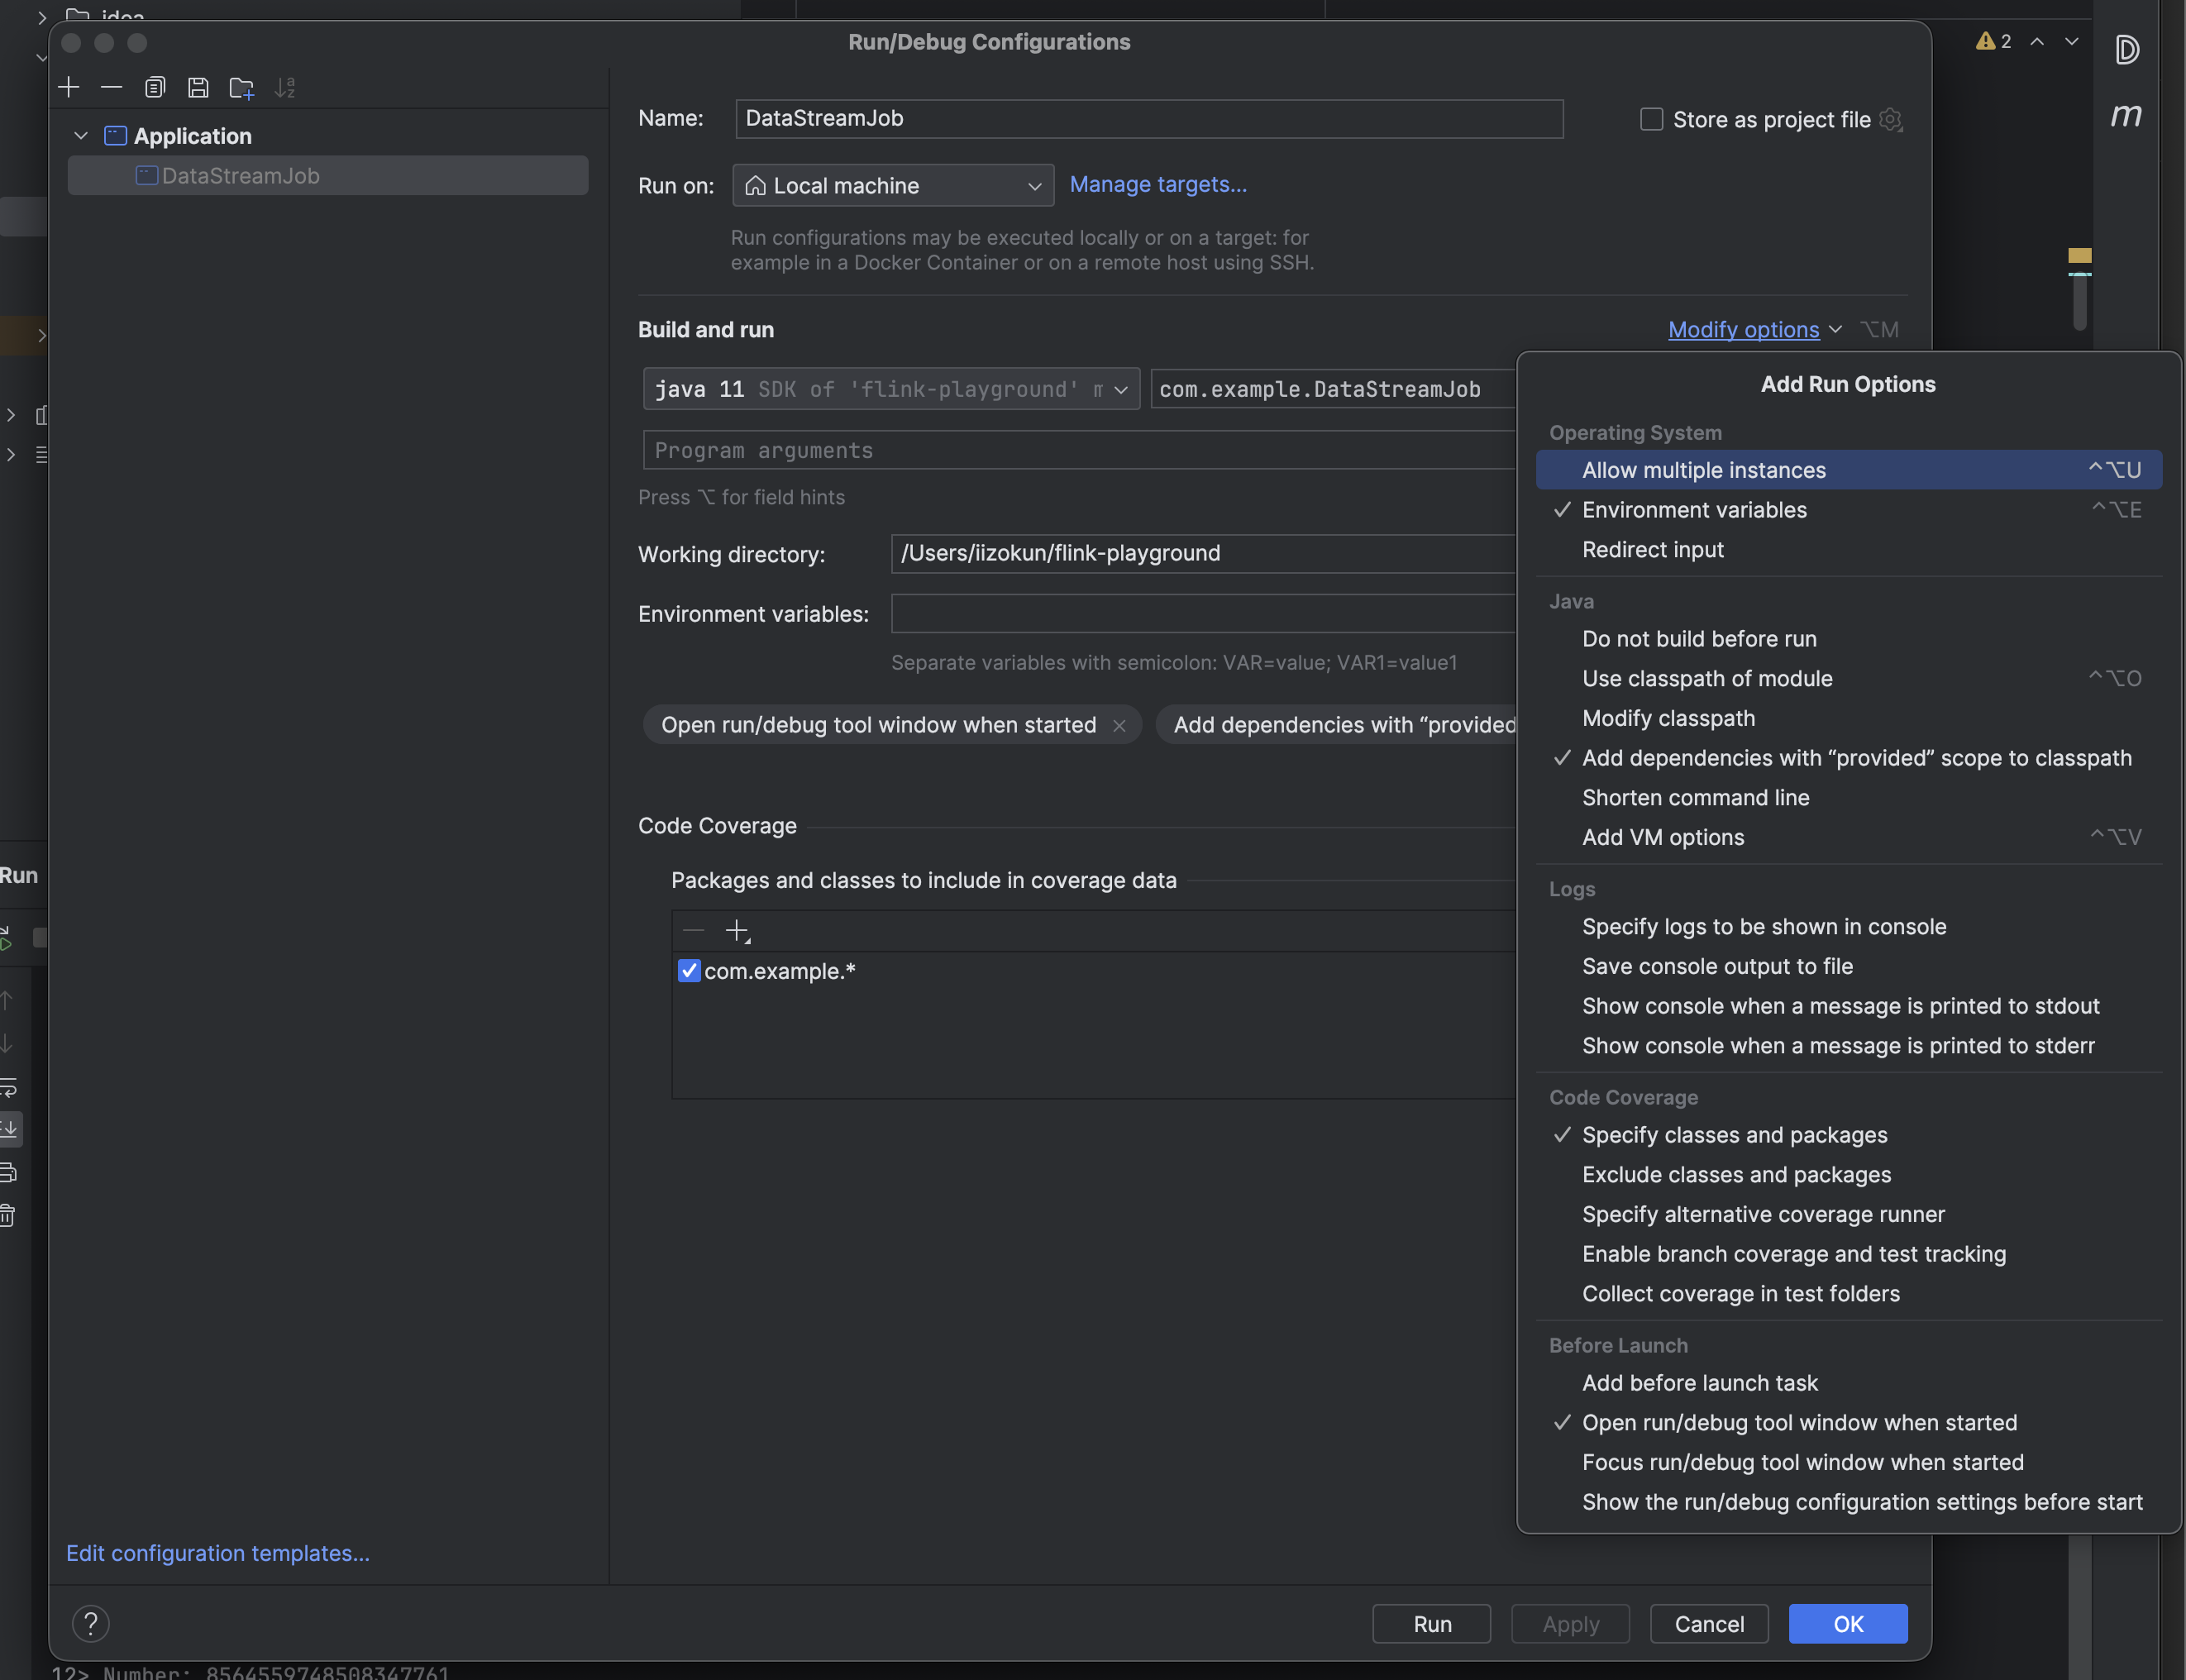
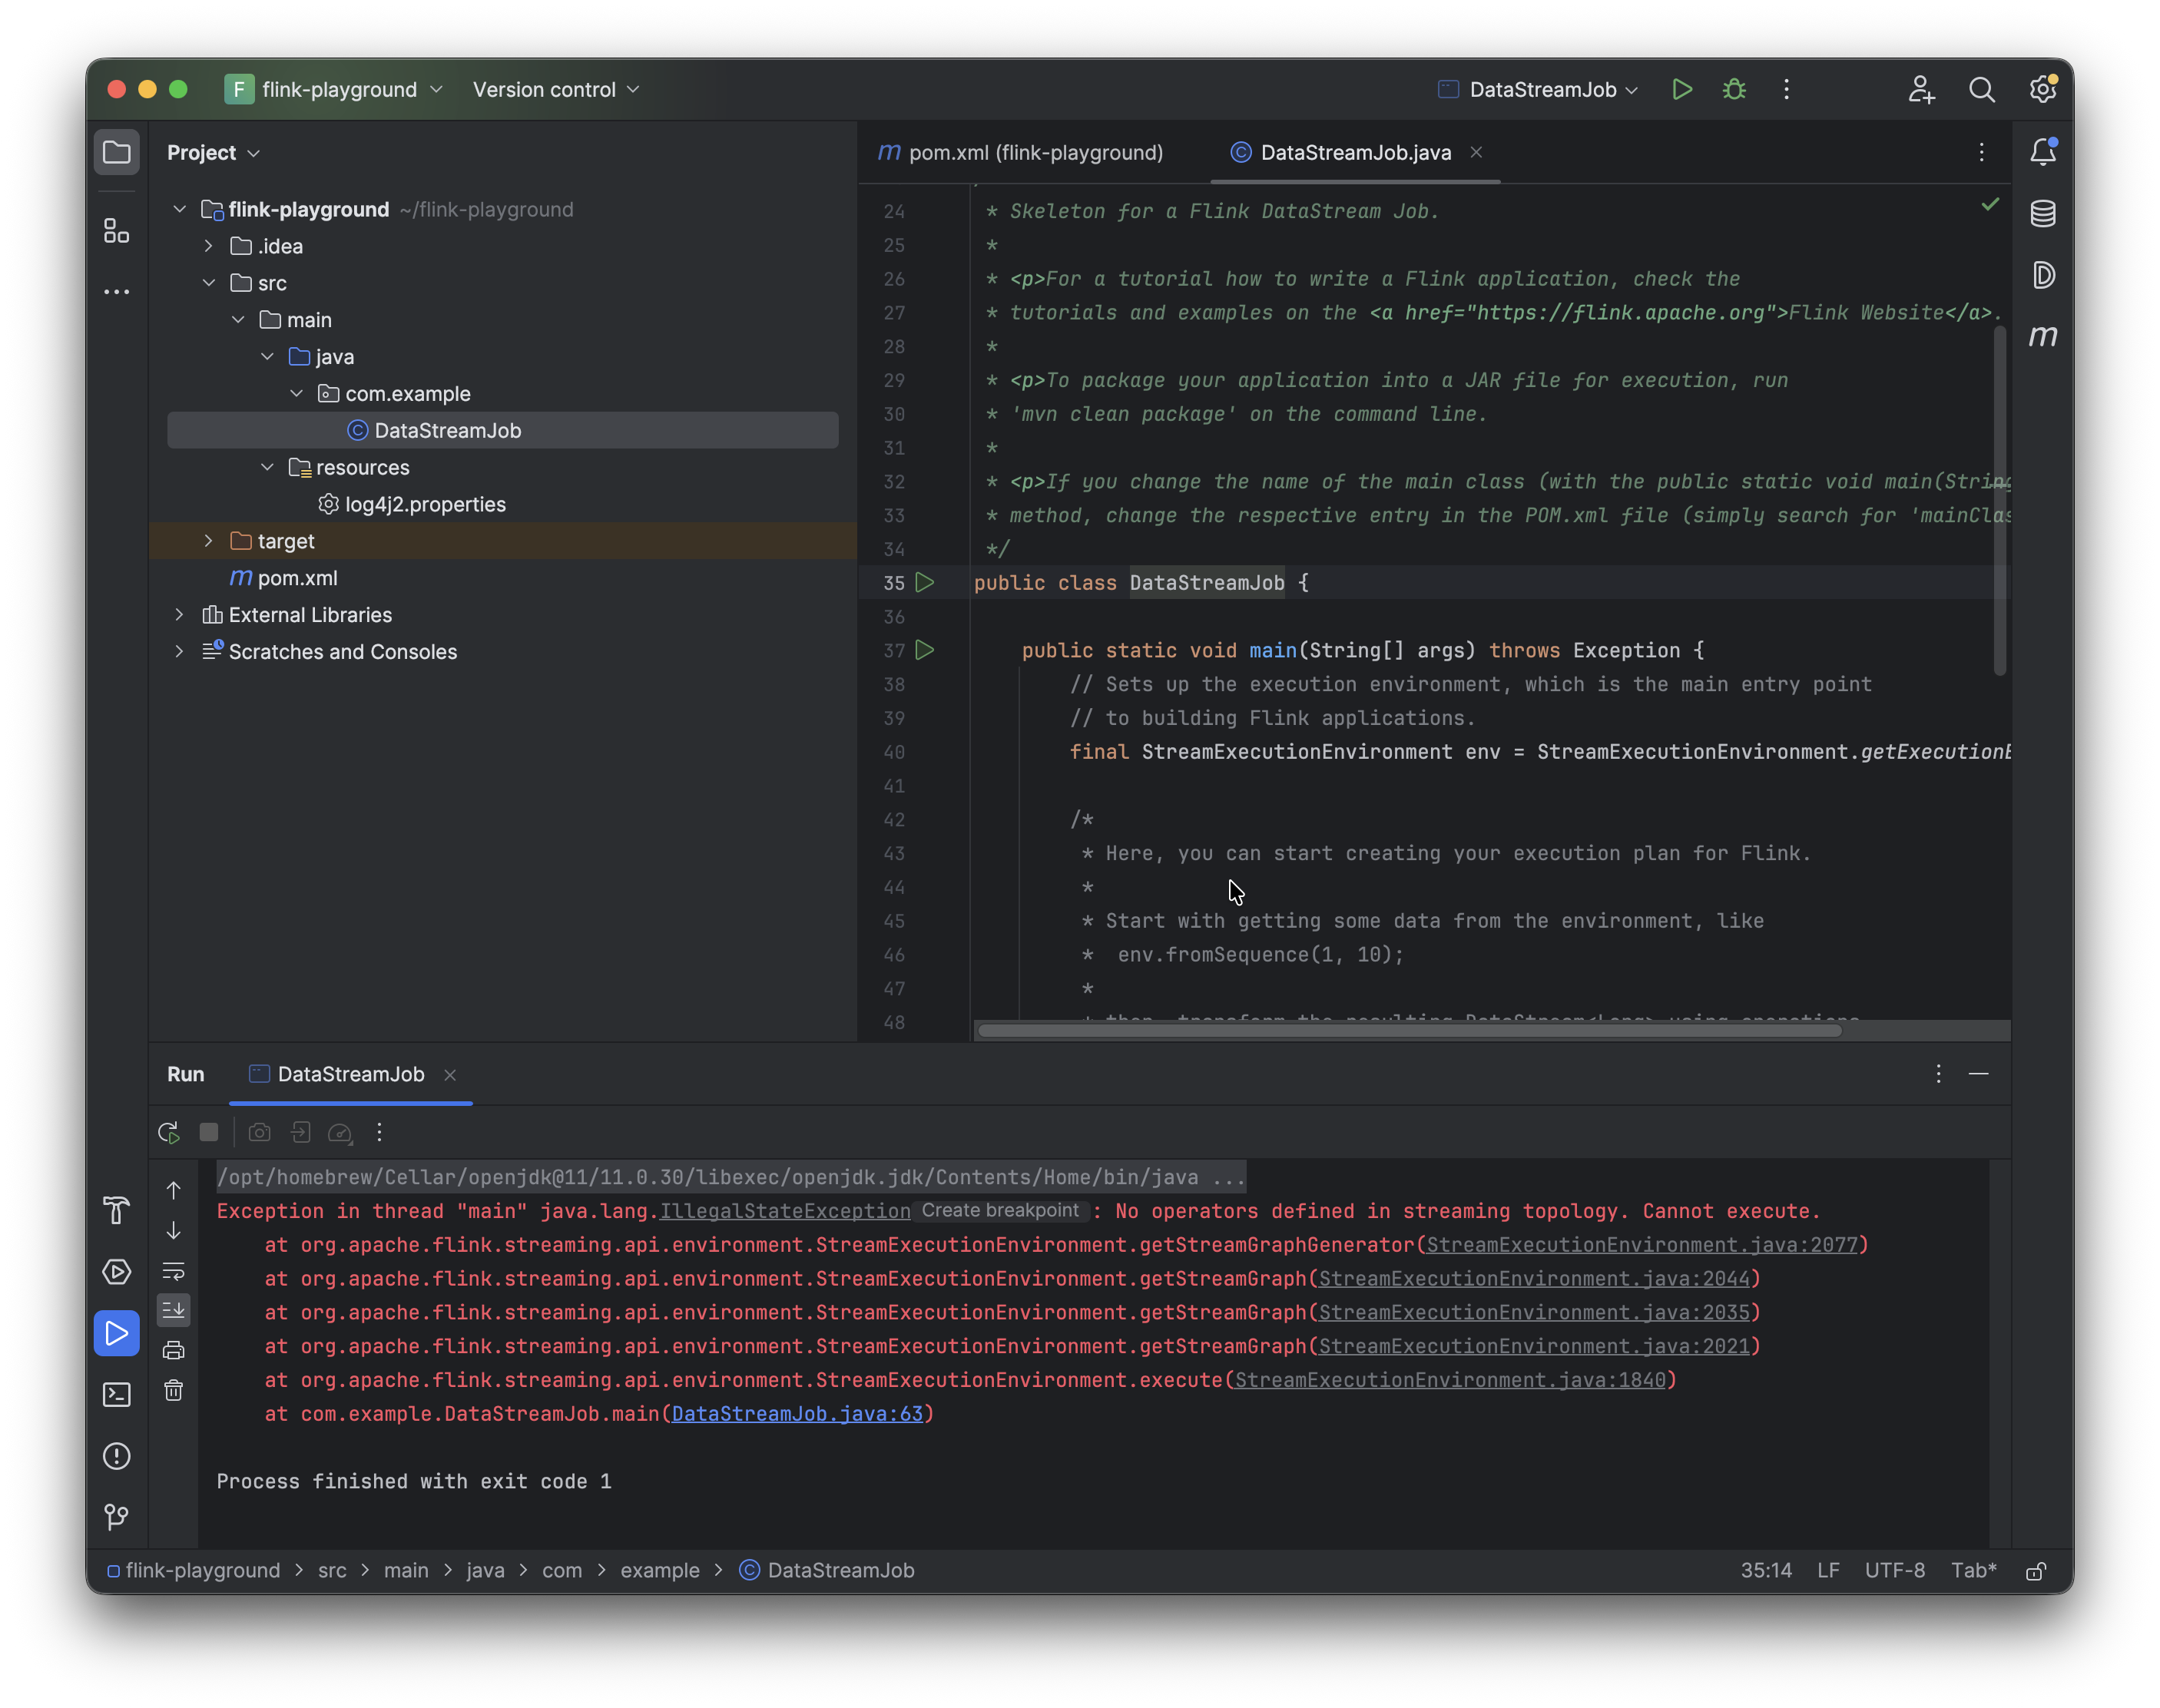
So, when running any Flink program, you start by clicking the Play button beside the file name at the top. OR you can click on the Run 'DataStreamJob.main()' button. Of course, DataStreamJob is a placeholder name and this would ideally be any program you create.

After clicking Play or Run, the program will fail at first. Then you go into the Edit Configurations tab and select “Add dependencies with 'provided' scope to classpath”. You'd need to do this with every program, or the other option would be to create a test that calls the application's main() method. I personally prefer the first option, shown in the images below.

8. Now we can go ahead and run DataStreamJob again. It'll fail because main has nothing inside it.
9. Add the following dependency to pom.xml for the Flink web dashboard, which can be accessed at http://localhost:8081.
<dependency>
  <groupId>org.apache.flink</groupId>
  <artifactId>flink-runtime-web</artifactId>
  <version>${flink.version}</version>
  <scope>provided</scope>
</dependency>
Once you've added the dependency for the web dashboard, swap the generic streaming execution line StreamExecutionEnvironment.getExecutionEnvironment() for:
Configuration conf = new Configuration();
StreamExecutionEnvironment env =
    StreamExecutionEnvironment.createLocalEnvironmentWithWebUI(conf);
Now if you run the program again and visit localhost:8081, you can see the Flink UI in action.
Coming up with the scripts
For the purposes of this demonstration, the goal is to set up a FileSource job with a strict timeout (for example, 60 seconds) and a moderately sized state backend like HashMapStateBackend. Then create a small Python file that serves as a “file generator” and use it to flood the Flink job with thousands of small files. As the enumerator state grows, checkpoints take longer to serialize and persist. Eventually they start timing out, which means Flink can't complete a checkpoint, which means on any failure the job restarts from an increasingly stale position OR, with too many consecutive checkpoint failures, the job dies entirely.
- Set up the Python script (the firehose) that floods small files into a directory. Then set up a Flink
FileSource job with checkpointing enabled and a strict timeout. (I chose 10 seconds because at 60 seconds it would have taken quite a while on my machine for the inconsistencies to show up.)
- At first everything works just fine. The checkpoints complete in very small amounts of time (milliseconds) and the pipeline runs without issue.
- Then we notice a slight degradation creeping up. Once we have tens of thousands of files, the checkpoint durations climb up visibly in the Web UI.
- Then the checkpoints begin to time out, consecutive failures stack up, and the job restarts or flat out dies.
- I will also be showing the checkpoint size and what is being tracked by the enumerator.
We now have Flink installed and configured.
The Flink Job
Make sure the following Flink dependencies are available in pom.xml: flink-streaming-java, flink-clients, and flink-connector-files.
<!-- For Example -->
<dependency>
    <groupId>org.apache.flink</groupId>
    <artifactId>flink-connector-files</artifactId>
    <version>${flink.version}</version>
</dependency>
The POJO is simple: a UserEvent with four fields. These plain fields match the CSV schema, plus a toString() so that the print() sink produces something we can read in the logs.
package com.example;

public class UserEvent {
    public long timestamp;
    public String userId;
    public String eventType;
    public double amount;

    @Override
    public String toString() {
        return timestamp + " | " + userId + " | " + eventType + " | " + amount;
    }
}
The event generator firehose.py is a small Python loop that writes one CSV file every iteration into /tmp/flink-input. Each file contains five rows of fake user events with the schema timestamp, user_id, event_type, amount. So we'll have a millisecond timestamp, a user ID drawn from a pool of 1,000, a randomly chosen event type (click, purchase, view, logout), and a random dollar amount.
import os
import time
import random

output_dir = "/tmp/flink-input"
os.makedirs(output_dir, exist_ok=True)

event_types = ["click", "purchase", "view", "logout"]
counter = 0

while True:
    counter += 1
    filename = f"events_{counter:08d}.csv"
    filepath = os.path.join(output_dir, filename)

    lines = []
    for _ in range(5):
        ts = int(time.time() * 1000)
        user = f"user{random.randint(1, 1000):04d}"
        event = random.choice(event_types)
        amount = round(random.uniform(1, 500), 2)
        lines.append(f"{ts},{user},{event},{amount}")

    with open(filepath, "w") as f:
        f.write("\n".join(lines))

    if counter % 10000 == 0:
        print(f"Generated {counter} files")
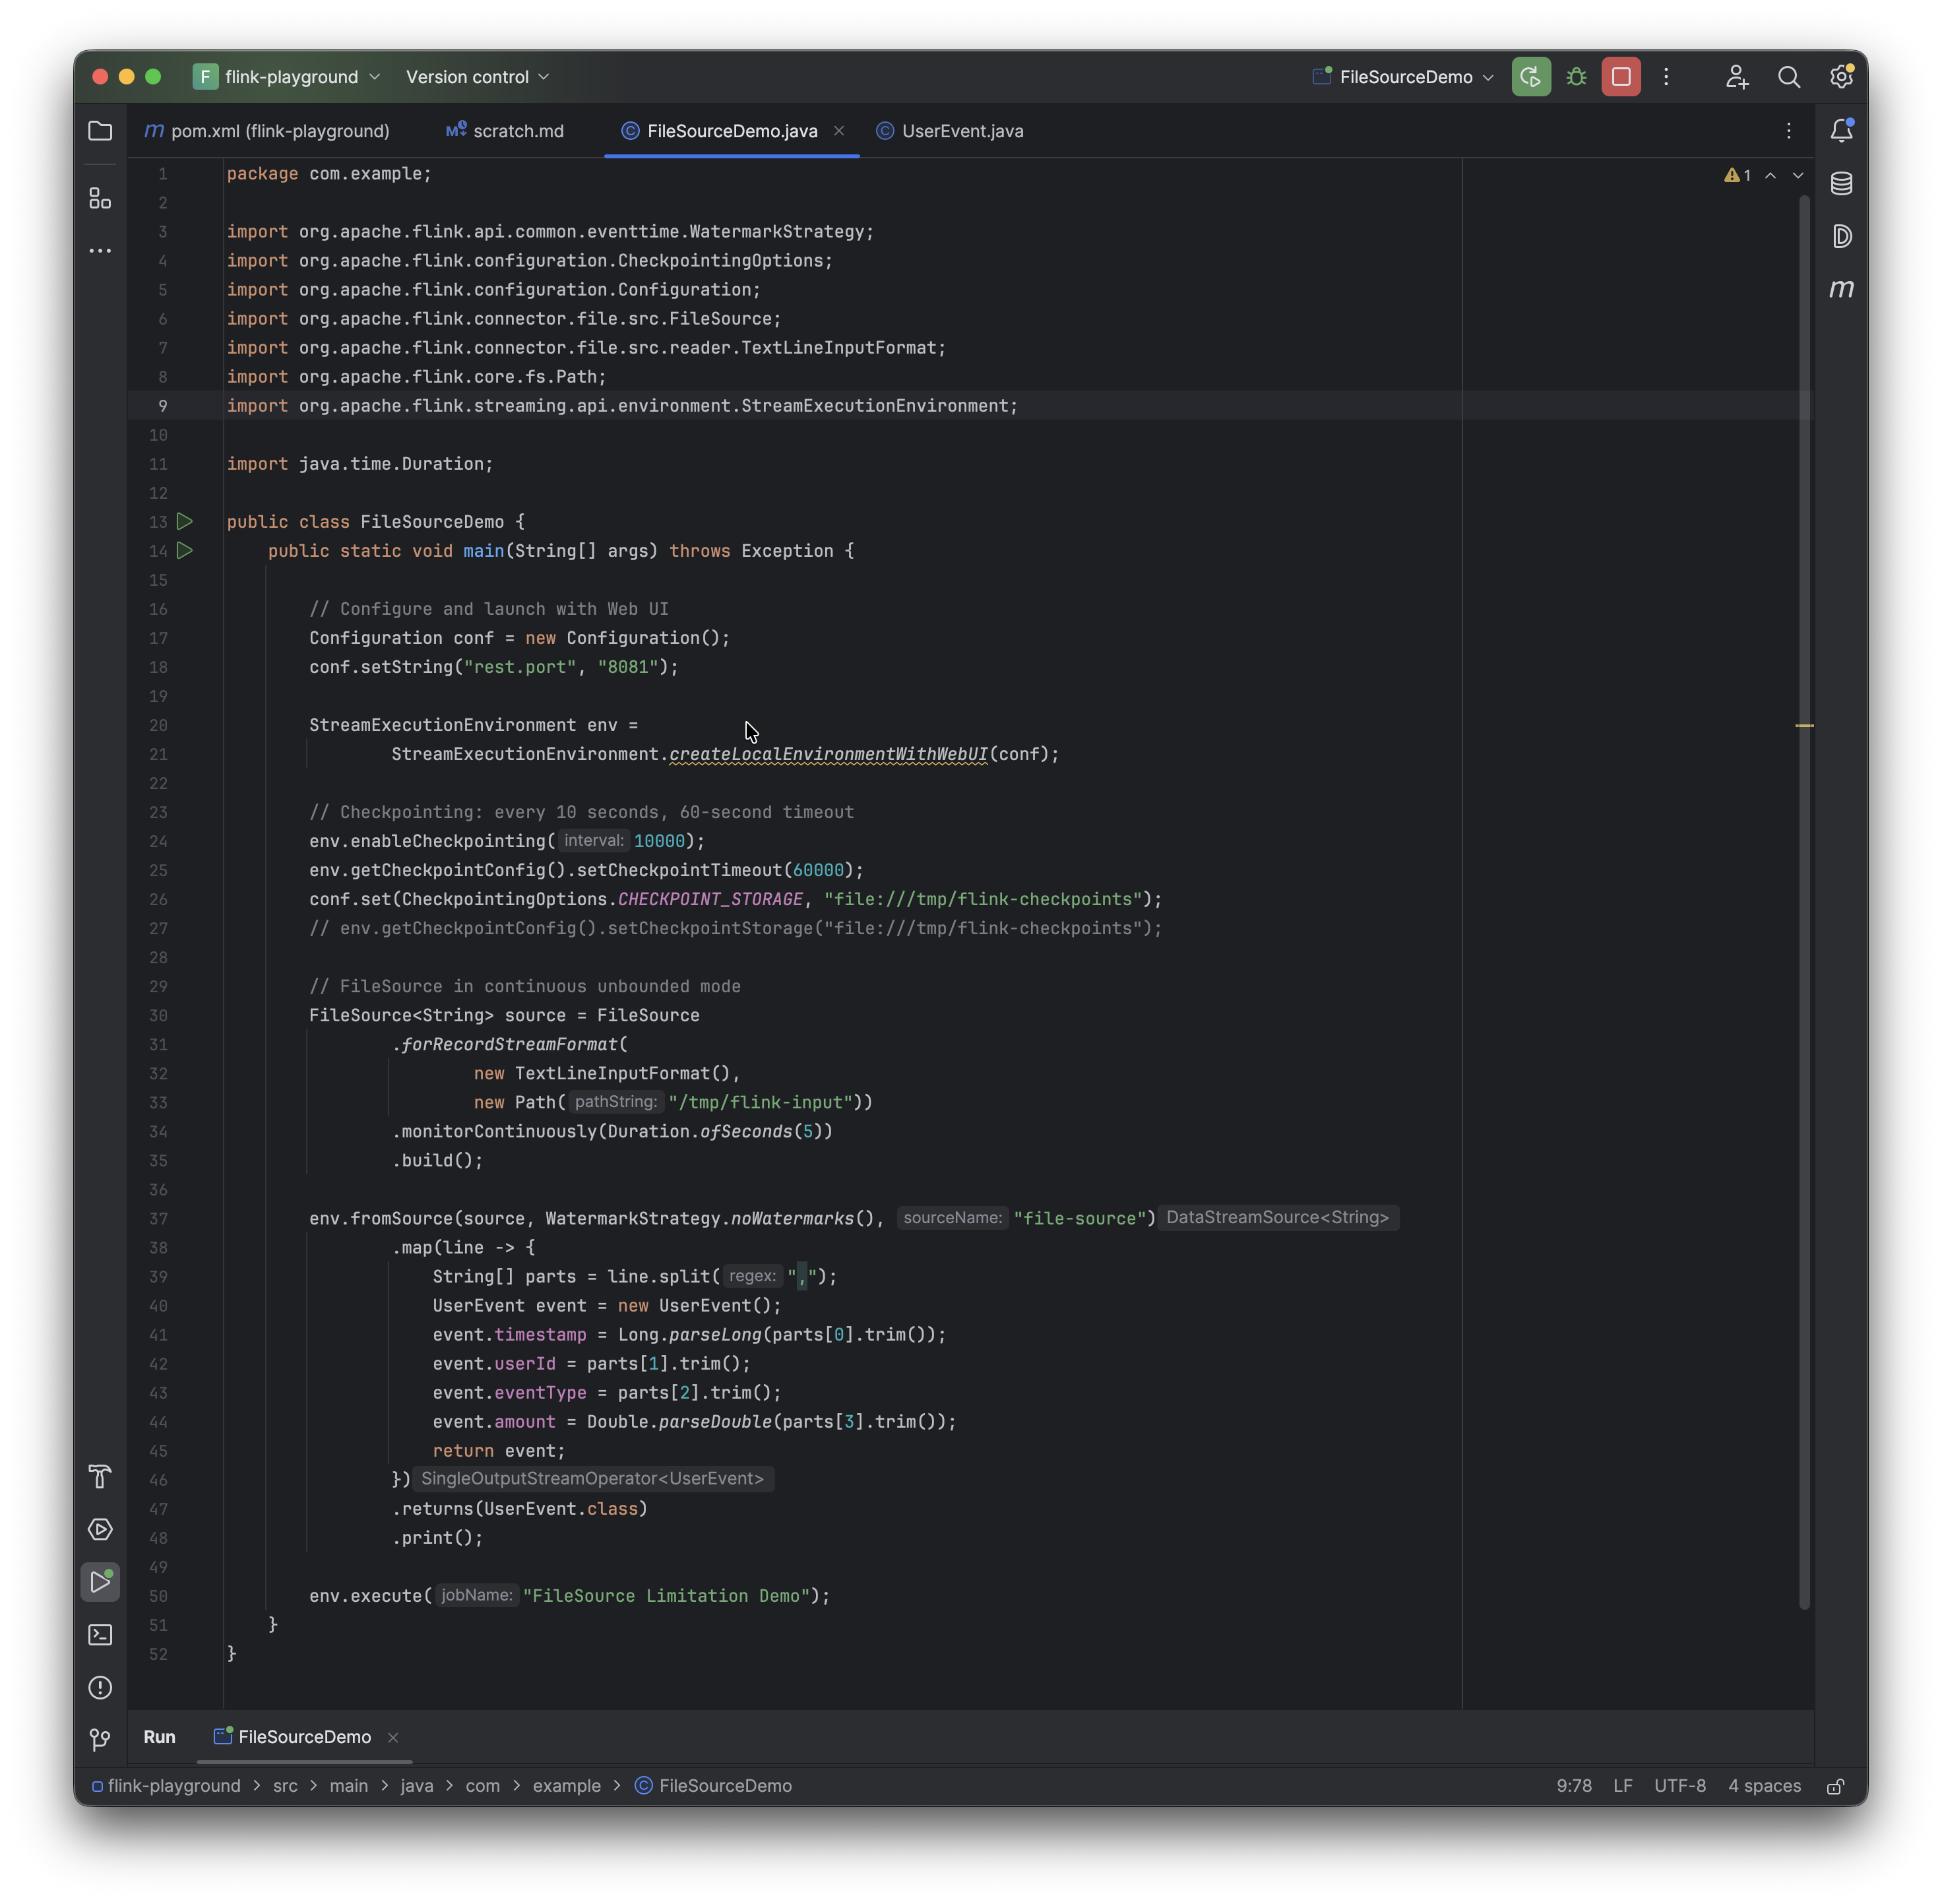
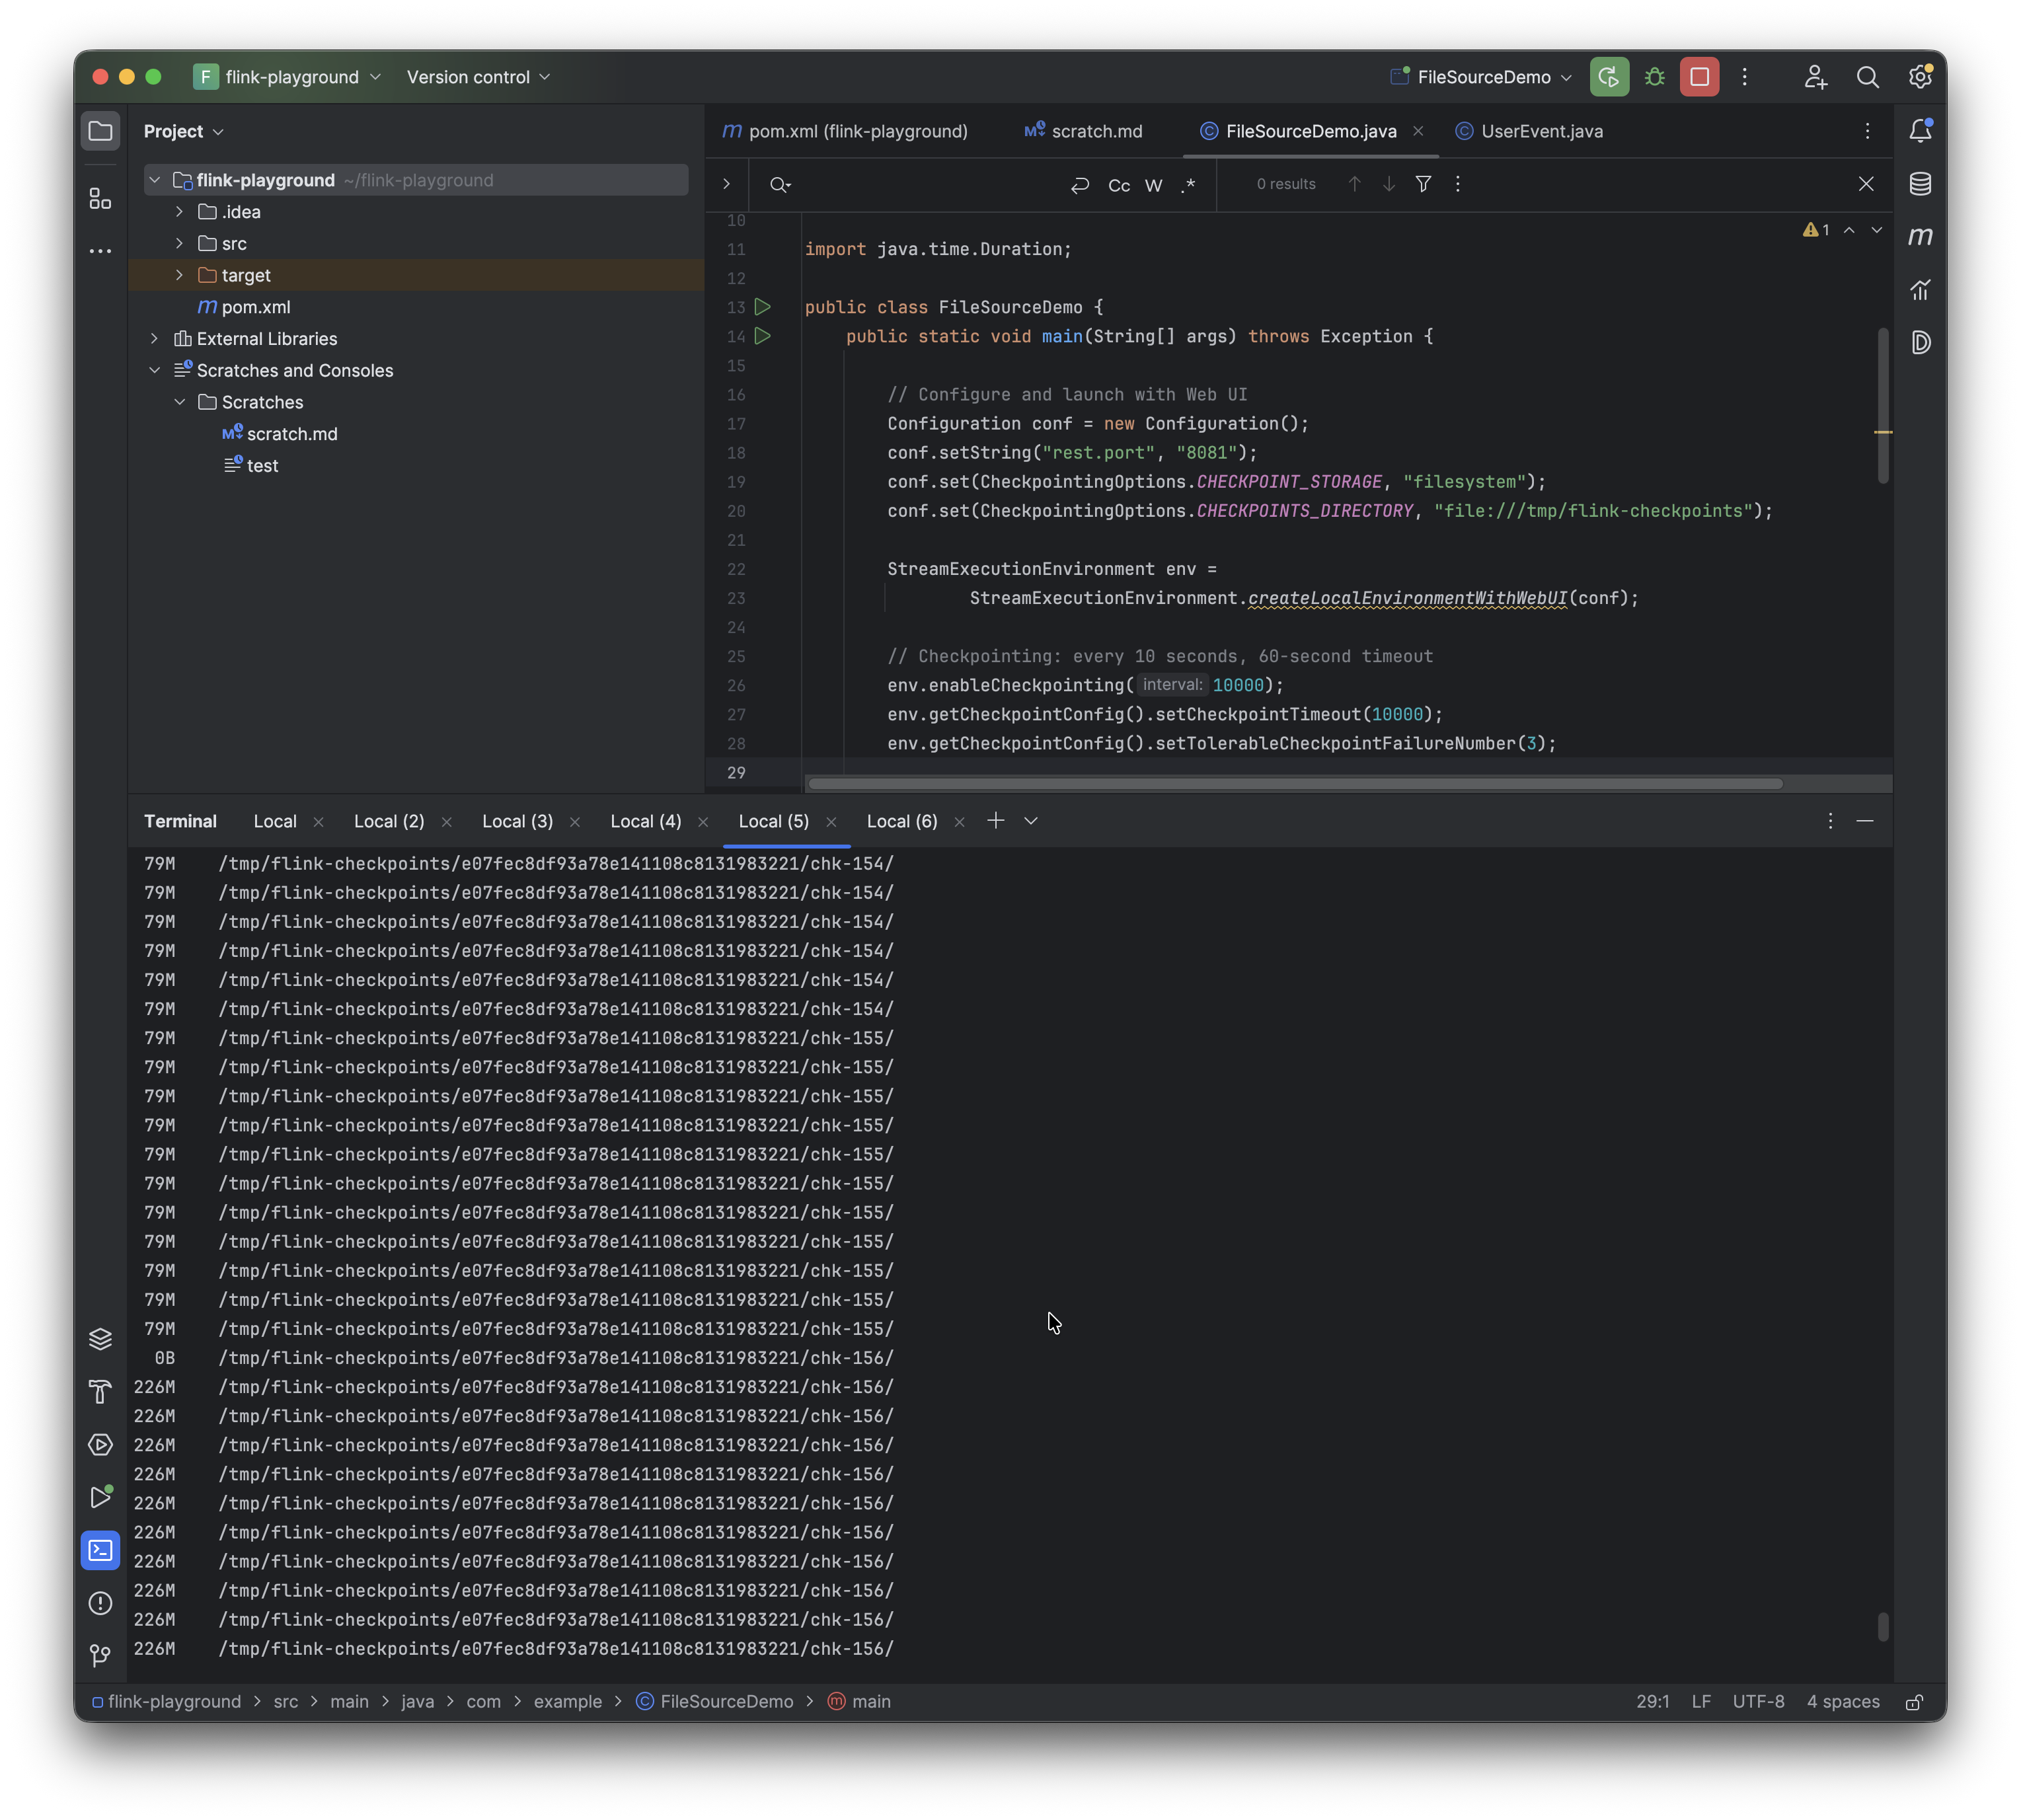
The Flink job is also quite simple and straightforward. The monitorContinuously call is what makes this UNBOUNDED. The Python generates raw data and the UserEvent POJO is what parses this data with the timestamp, userId, eventType, and amount fields.
The pipeline reads files, parses records, and outputs results.
package com.example;

import org.apache.flink.api.common.eventtime.WatermarkStrategy;
import org.apache.flink.configuration.CheckpointingOptions;
import org.apache.flink.configuration.Configuration;
import org.apache.flink.connector.file.src.FileSource;
import org.apache.flink.connector.file.src.reader.TextLineInputFormat;
import org.apache.flink.core.fs.Path;
import org.apache.flink.streaming.api.environment.StreamExecutionEnvironment;

import java.time.Duration;

public class FileSourceDemo {
    public static void main(String[] args) throws Exception {

        // Configure and launch with Web UI
        Configuration conf = new Configuration();
        conf.setString("rest.port", "8081");
        conf.set(CheckpointingOptions.CHECKPOINT_STORAGE, "filesystem");
        conf.set(CheckpointingOptions.CHECKPOINTS_DIRECTORY, "file:///tmp/flink-checkpoints");

        StreamExecutionEnvironment env =
                StreamExecutionEnvironment.createLocalEnvironmentWithWebUI(conf);

        // Checkpointing: every 10 seconds, 10-second timeout
        // Checkpointing is when (every 10 seconds) Flink pauses briefly, serializes the state of every operator (including the enumerator's list of processed file paths), and writes it to disk. I set it up to 10 seconds because I want to see the problem develop relatively quickly.

        // So we have a checkpoint every 10 seconds, with a matching 10-second timeout and a tolerance of 3 failed checkpoints before the job dies.
        env.enableCheckpointing(10000);
        env.getCheckpointConfig().setCheckpointTimeout(10000);
        env.getCheckpointConfig().setTolerableCheckpointFailureNumber(3);

        // FileSource in continuous unbounded mode
        FileSource<String> source = FileSource
                .forRecordStreamFormat(
                        new TextLineInputFormat(),
                        new Path("/tmp/flink-input"))
                .monitorContinuously(Duration.ofSeconds(5))
                .build();

        env.fromSource(source, WatermarkStrategy.noWatermarks(), "file-source")
                .map(line -> {
                    String[] parts = line.split(",");
                    UserEvent event = new UserEvent();
                    event.timestamp = Long.parseLong(parts[0].trim());
                    event.userId = parts[1].trim();
                    event.eventType = parts[2].trim();
                    event.amount = Double.parseDouble(parts[3].trim());
                    return event;
                })
                .returns(UserEvent.class)
                .print();

        env.execute("FileSource Limitation Demo");
    }
}
I start by running the Flink job first, and then in a separate terminal I run the Python script with a command like python3 firehose.py.
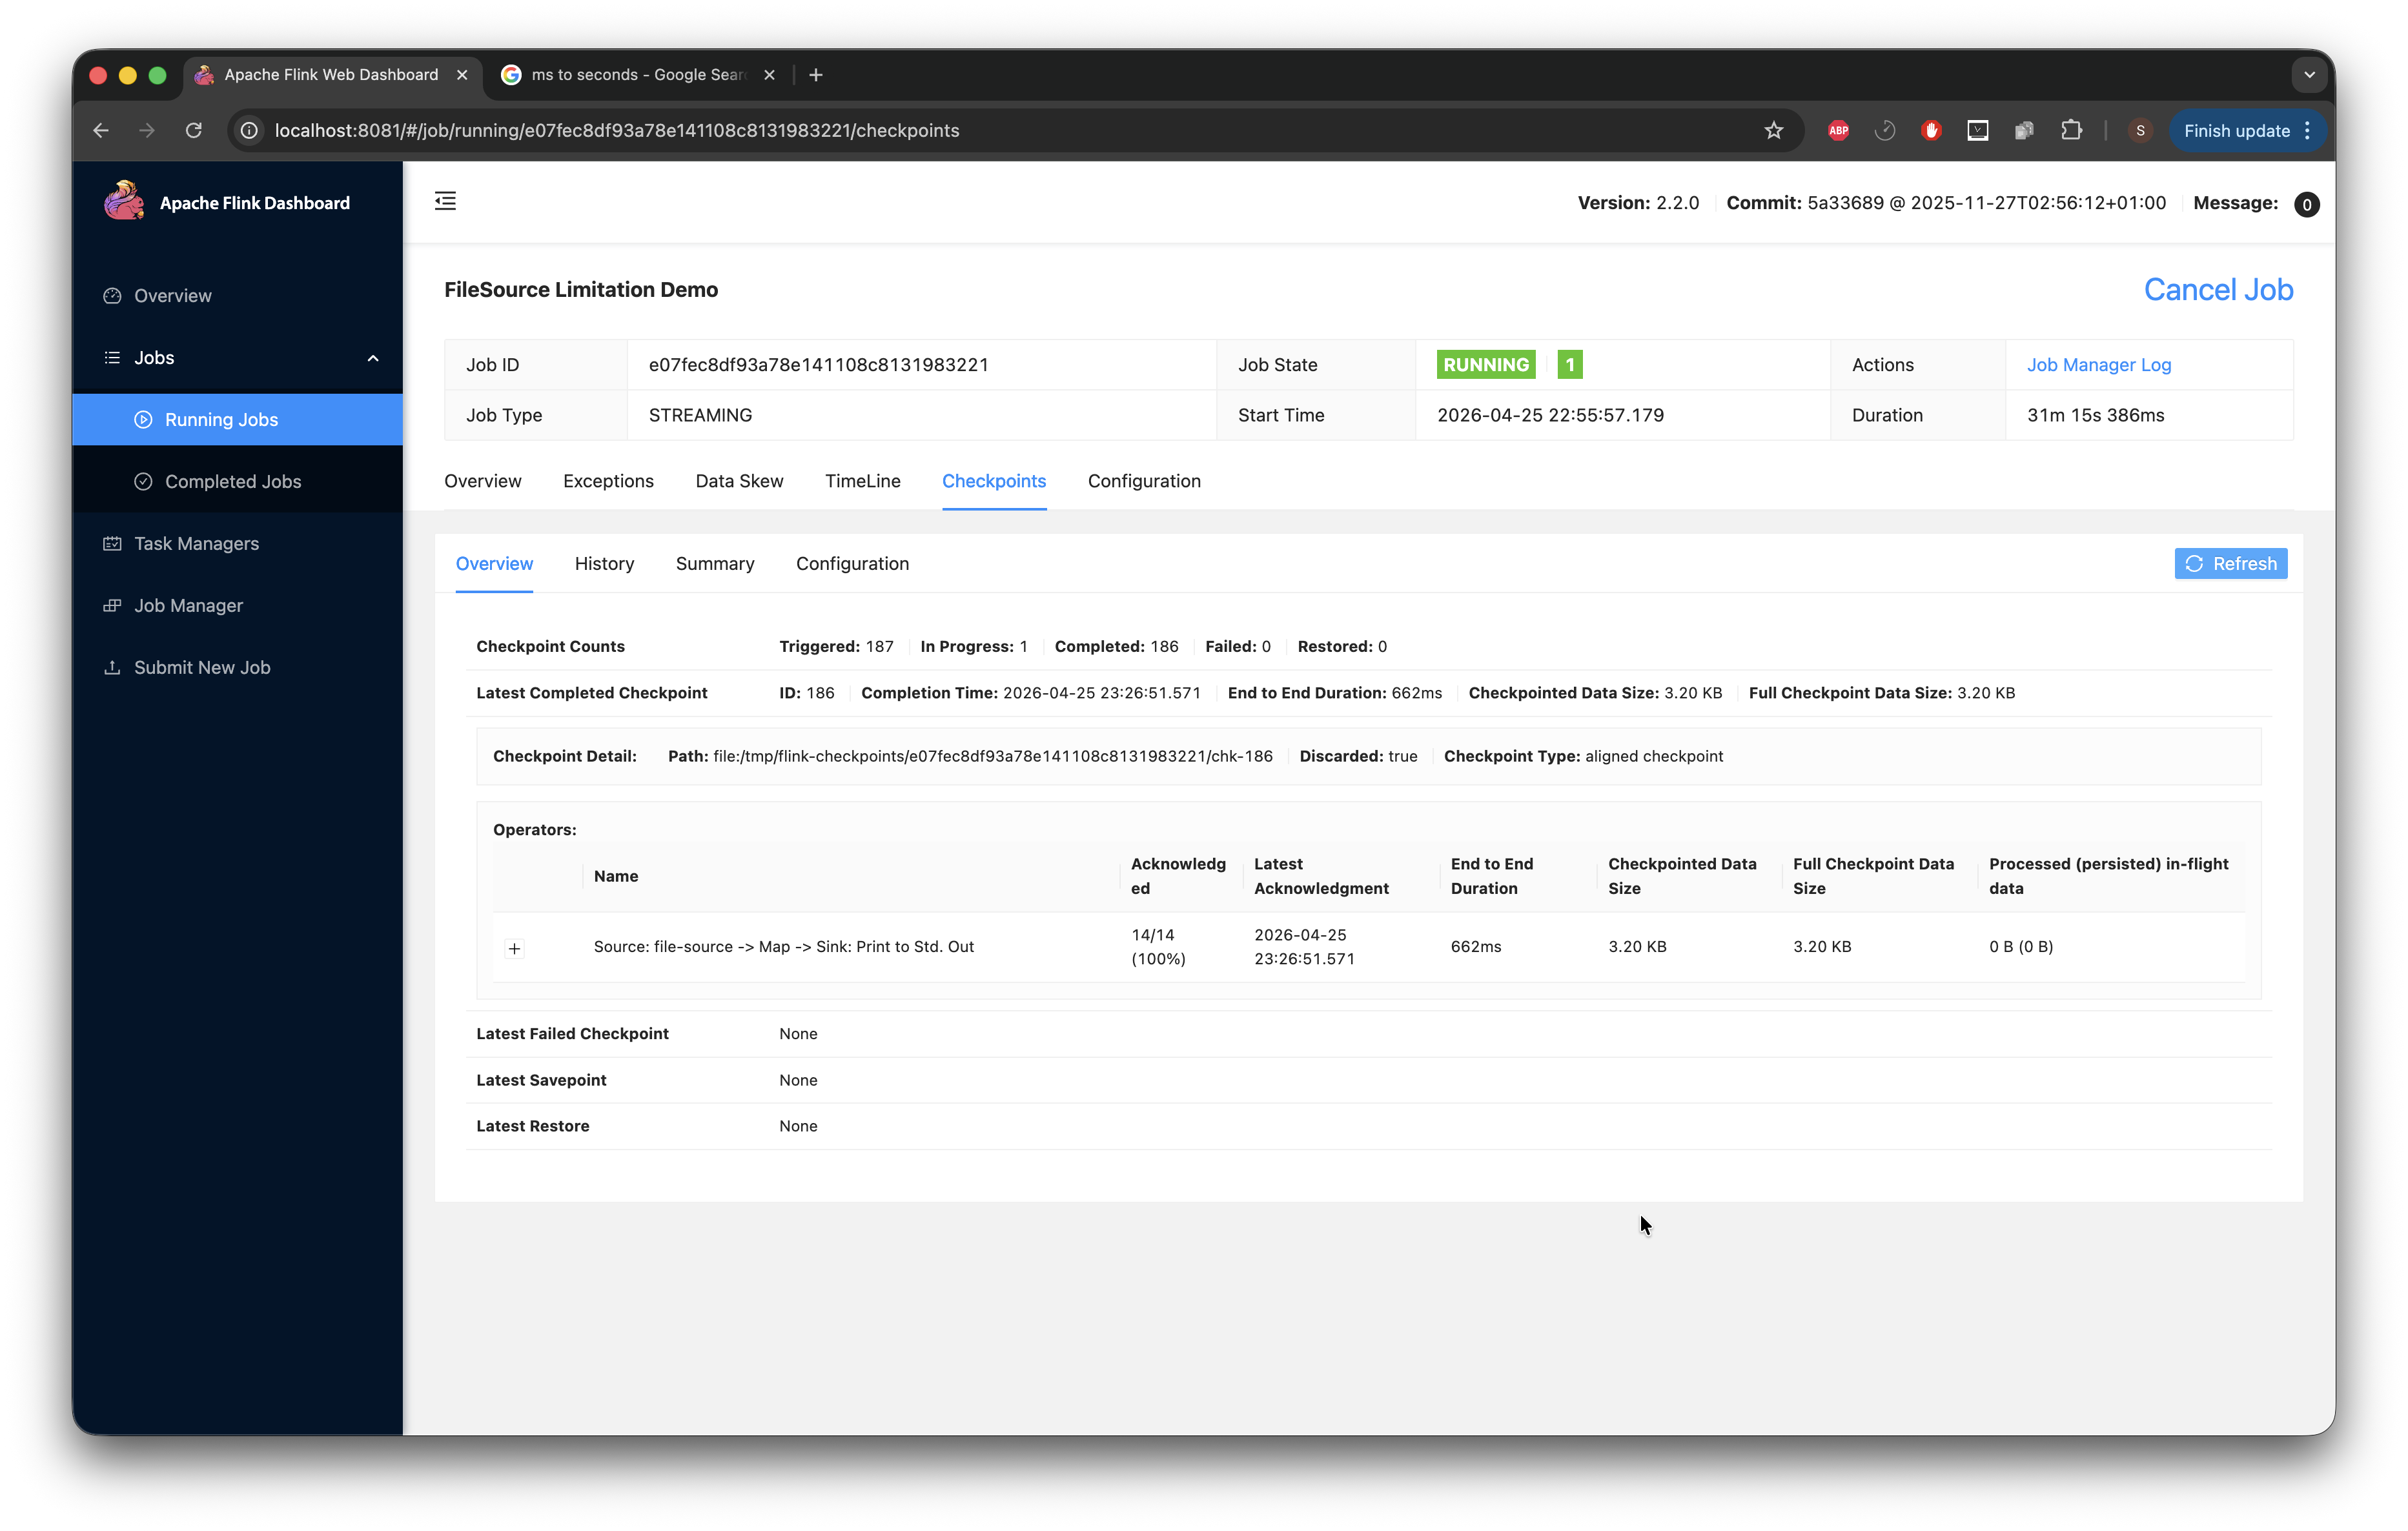
After that, I flip over to the Web UI at localhost:8081 to take a look at the running job and open the checkpoints tab.
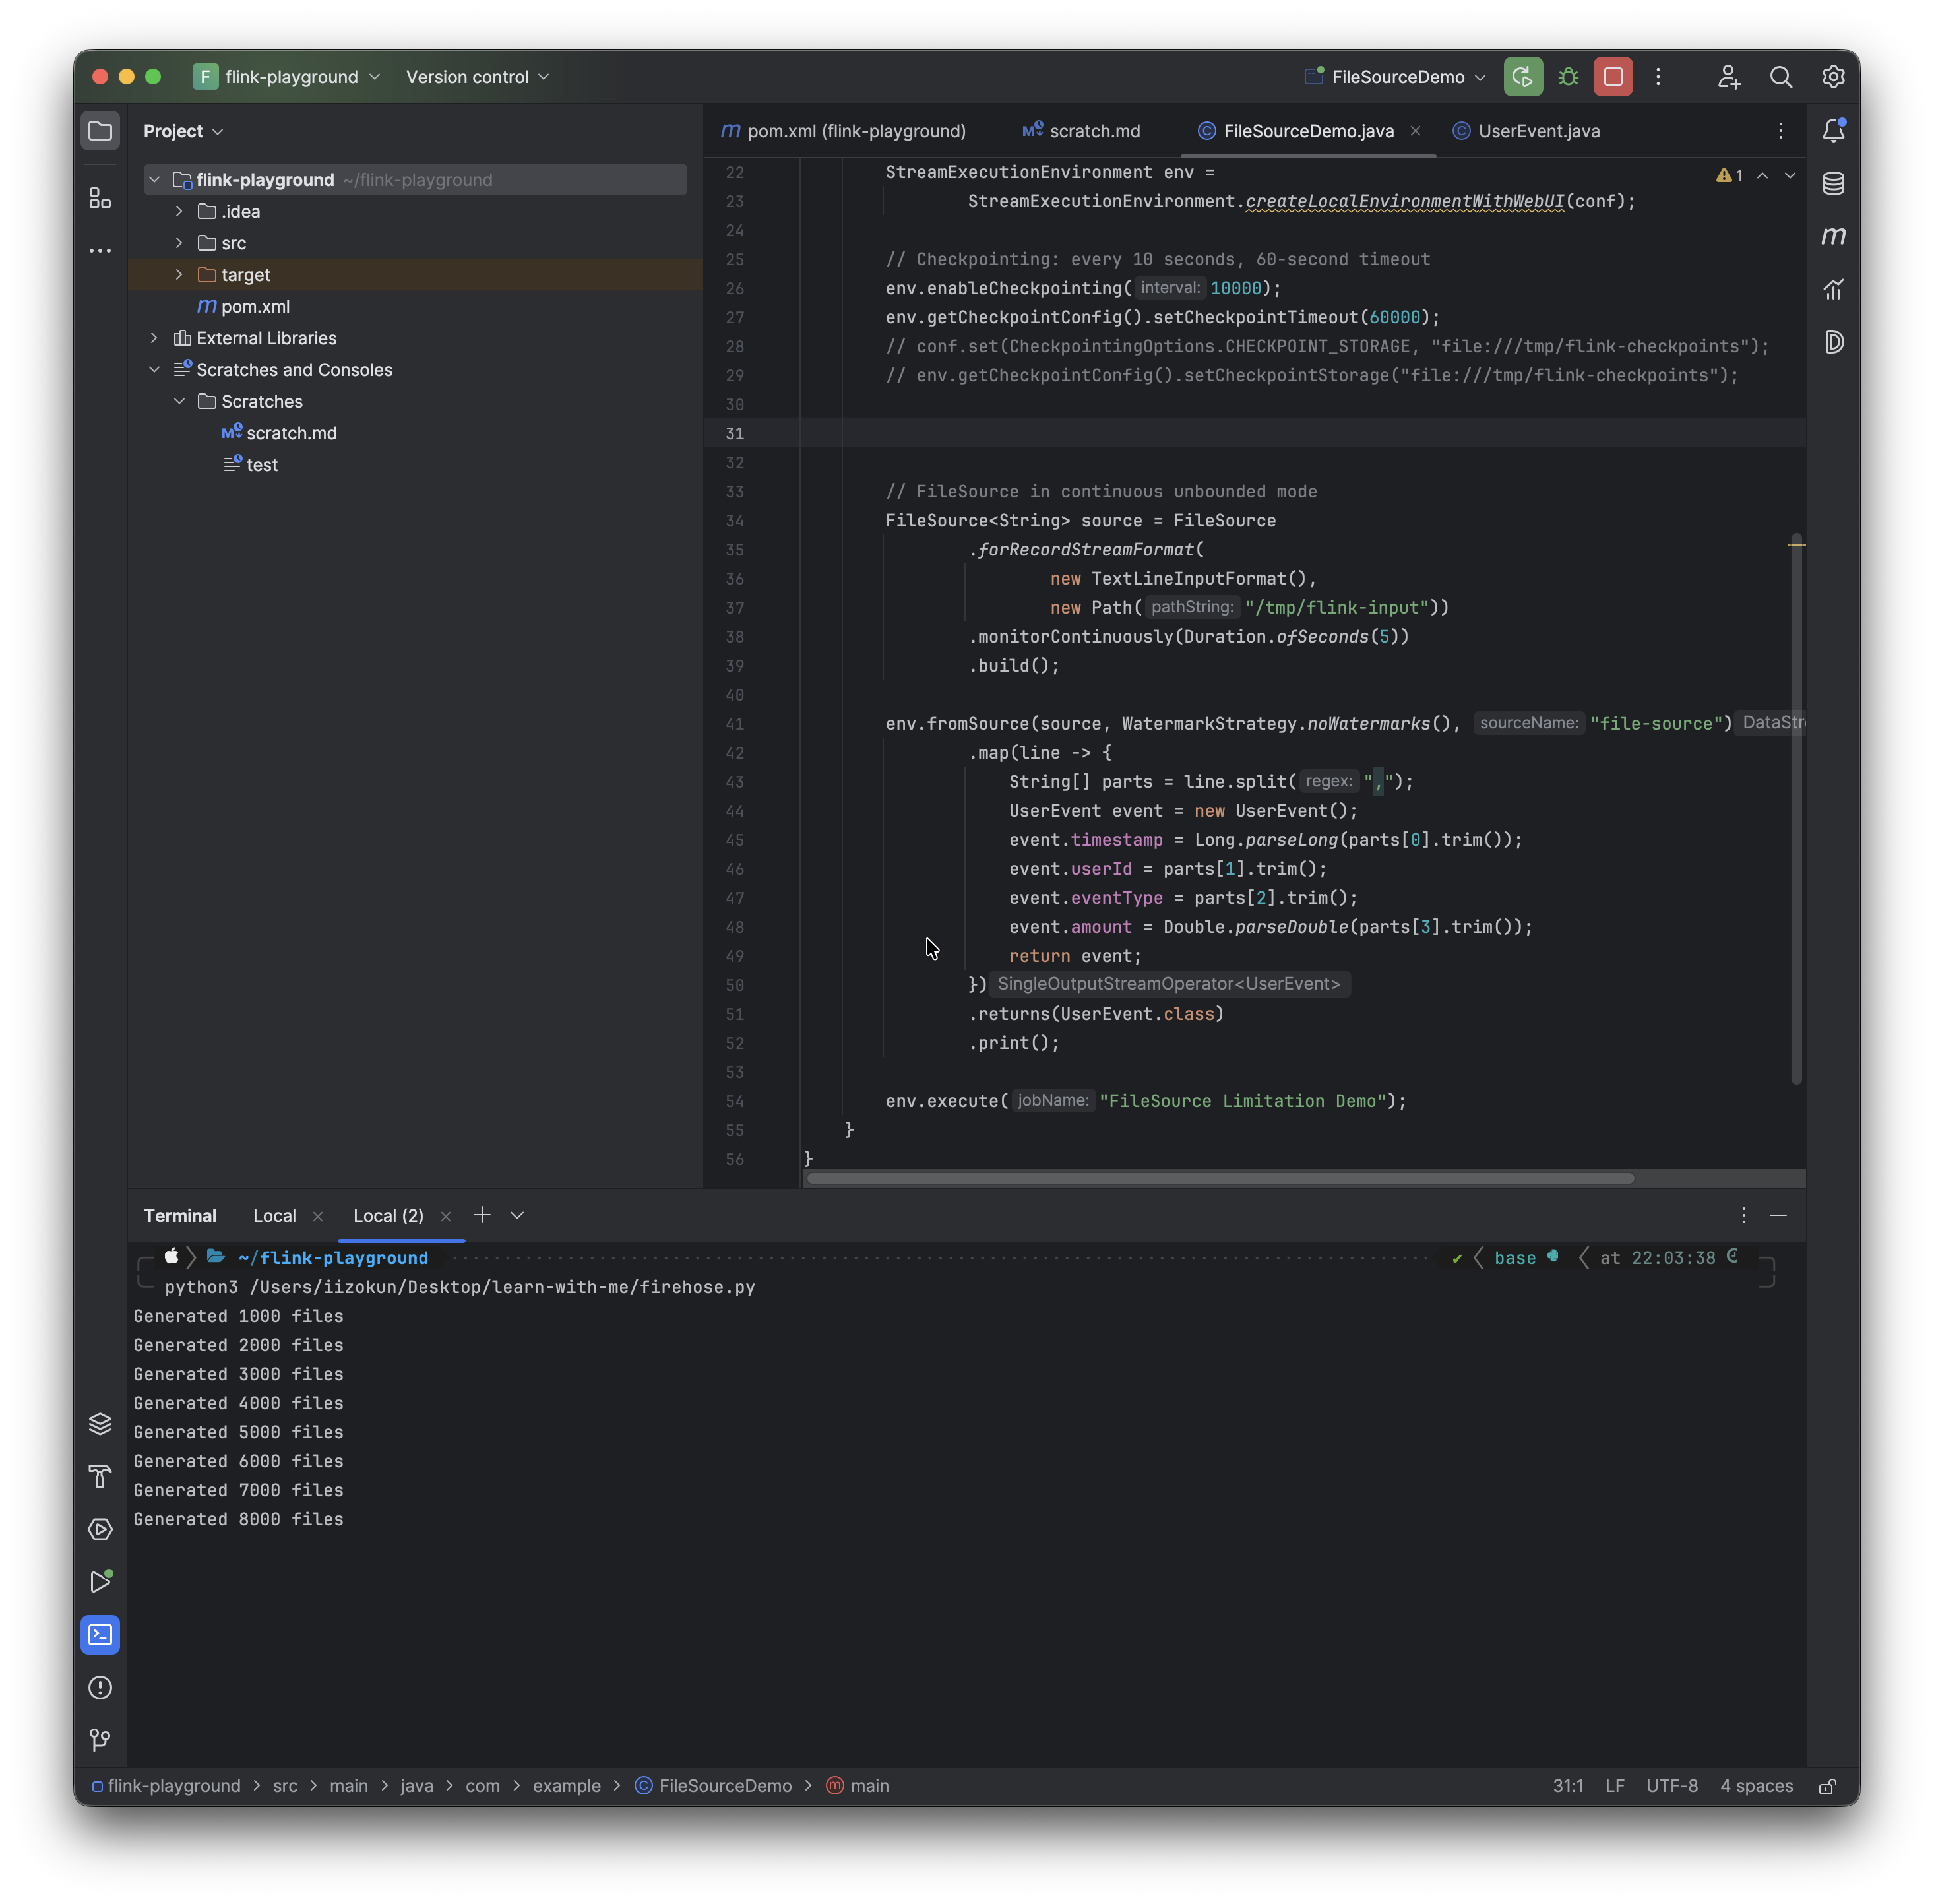
We can see the generated files (from the firehose script) above.
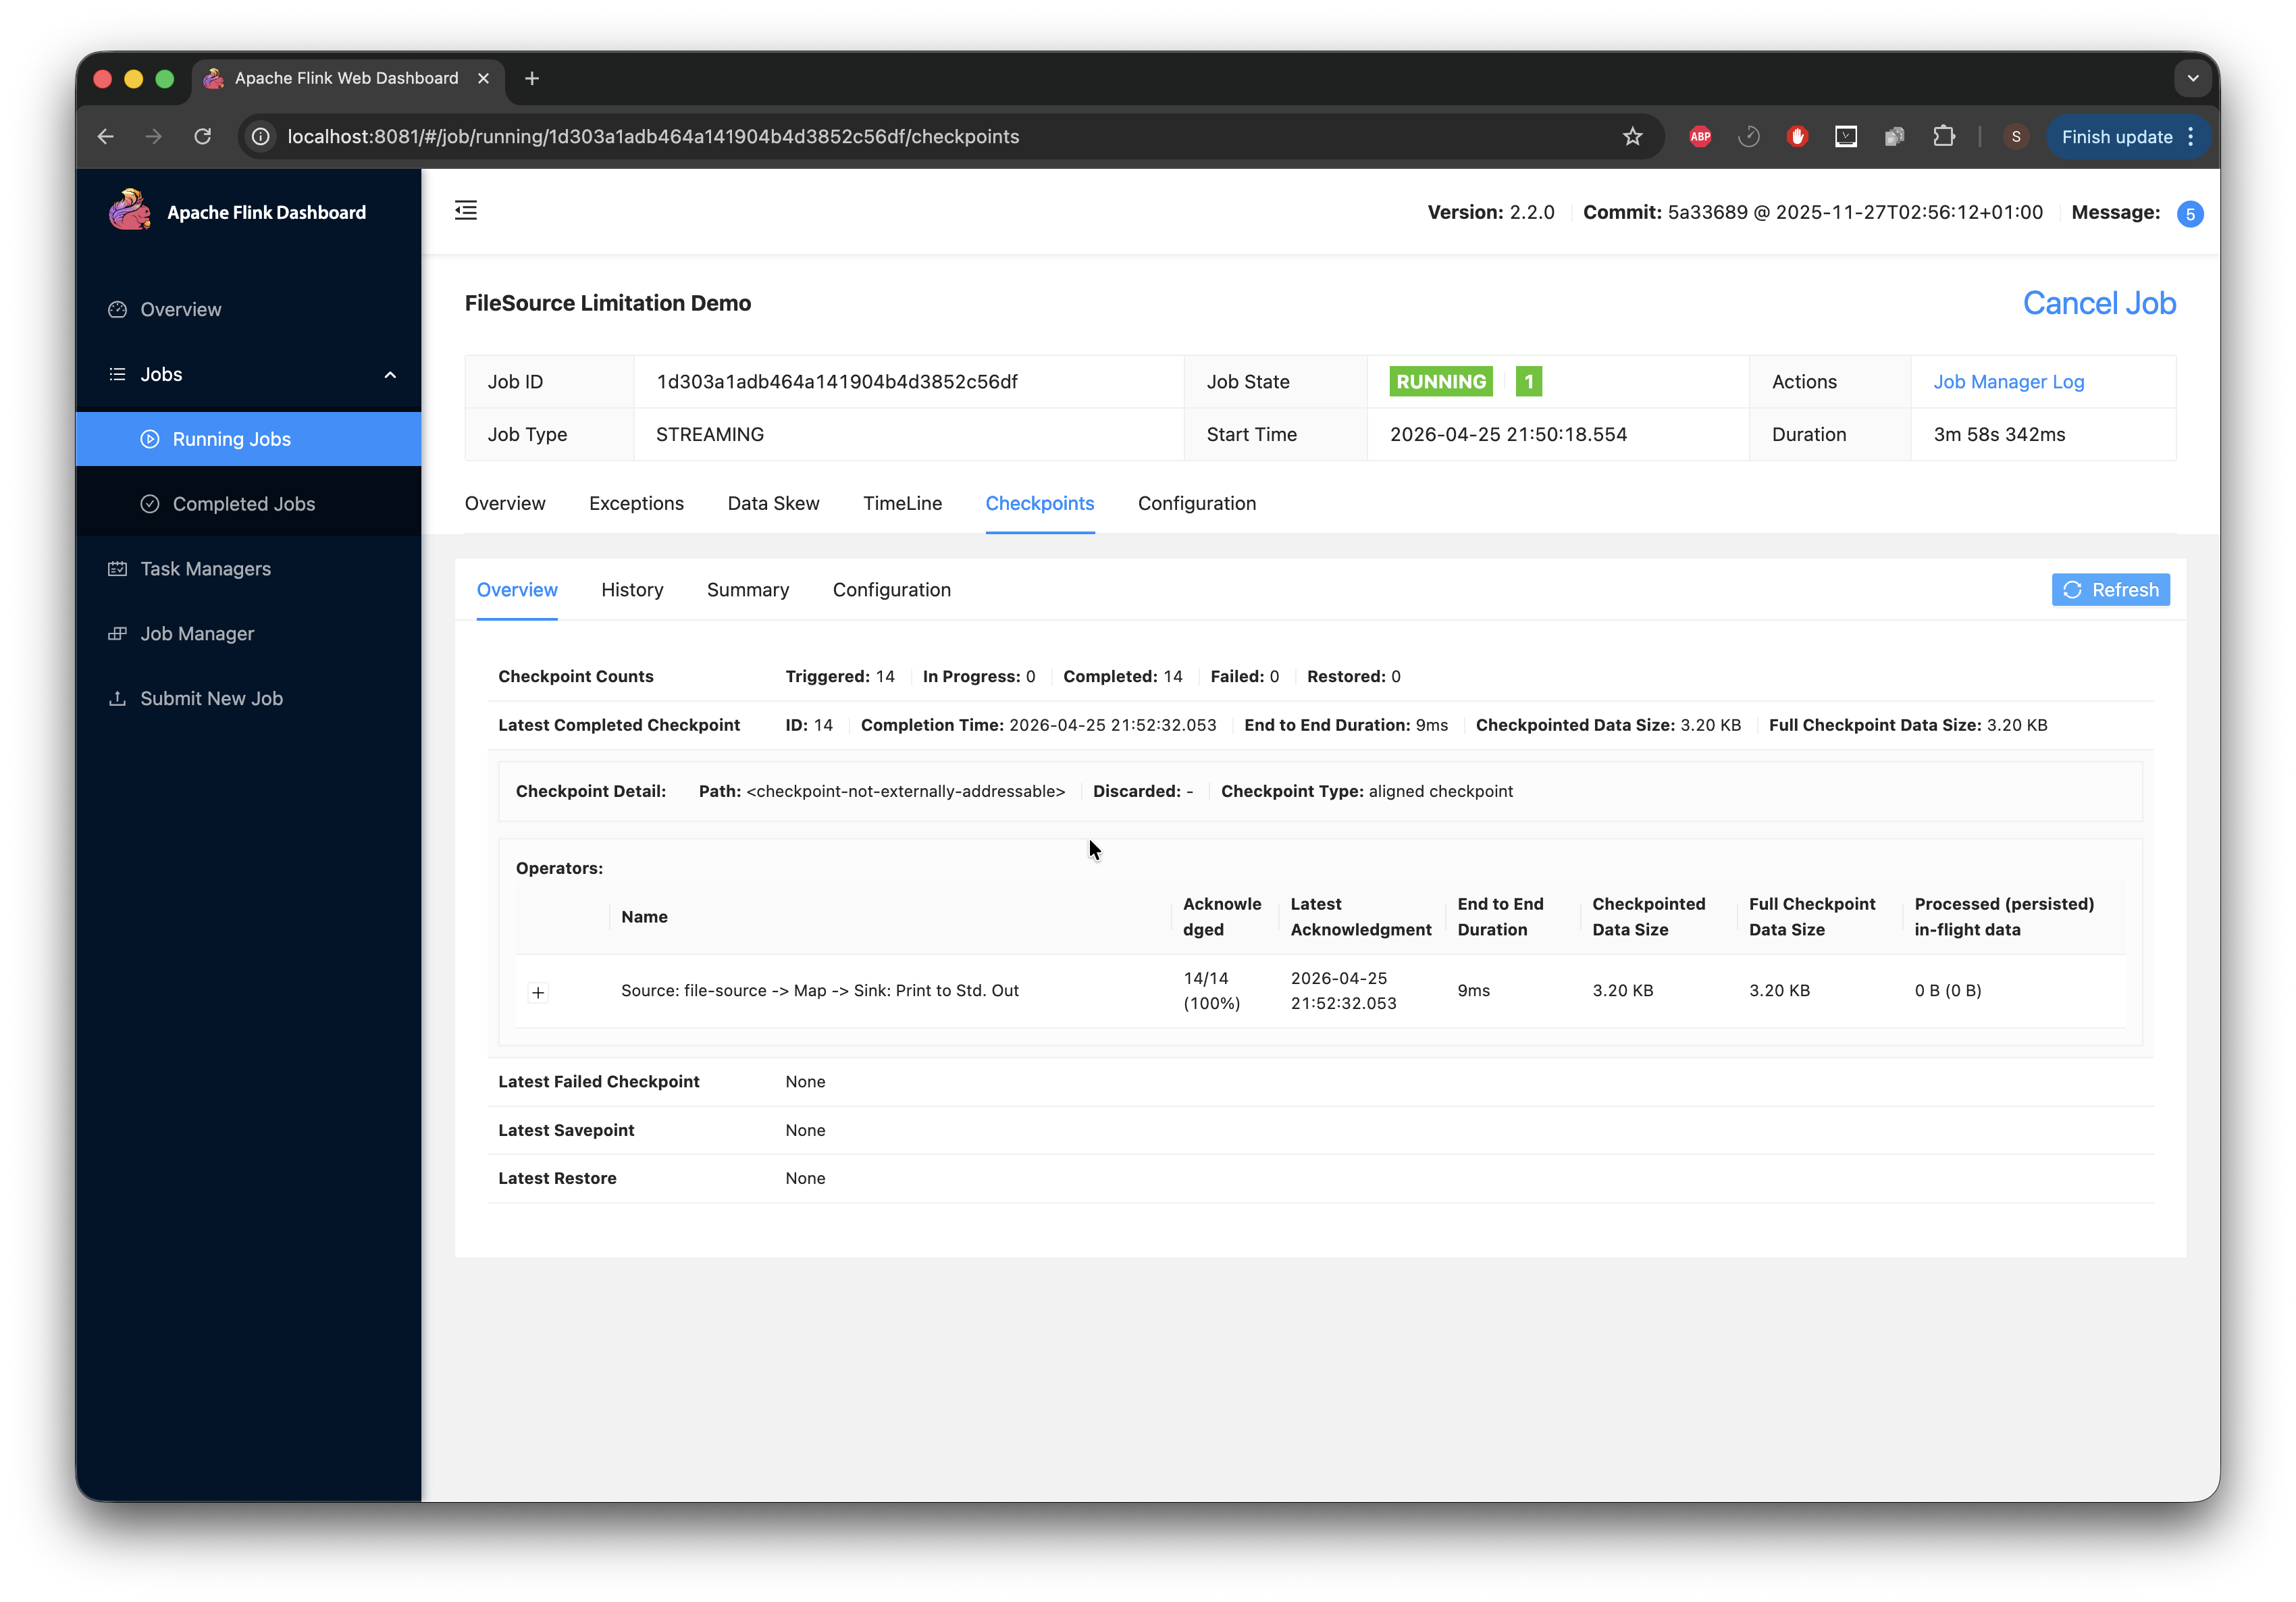
The image below shows the checkpoint End-to-End duration at 9ms, which is still quite low. Now we wait for that number to climb.
After a while, using the following command on my CLI while true; do du -sh /tmp/flink-checkpoints/*/chk-*/ 2>/dev/null; sleep 1; done, I can see the checkpoint we are currently at (note this can also be viewed in the UI as shown) and the space it's taking up. There are some gaps where we have 0B; I discovered that this shows when the next checkpoint is about to come up, so there is nothing to save.
At this stage, I'd like to stop and point out something I discovered. The Flink UI has the checkpointed data size at 3.20 KB. While working on this, I expected that to change, but it did not. No matter how much I could see the checkpoint growing via the CLI, or the duration growing from 9ms, it didn't make a difference and the checkpoint data size stayed at 3.20 KB. I tried everything and did troubleshooting; the while true; do du -sh /tmp/flink-checkpoints/xxxx/chk-*/ 2>/dev/null; sleep 1; done commands I ran all showed that the checkpoints were growing to > 30 MB. The documentation provided definitions for the fields in the UI but offered no insight into why the checkpoint size was stuck at 3.20 KB. In those docs, something that caught my eye was that “Full Checkpoint Data Size: The accumulated checkpoint data size over all acknowledged subtasks”. The FileSource enumerator state is for some reason not an acknowledged subtask.
After playing the waiting game for a while (about 30 minutes), we can see that the duration is starting to climb very high.
At a certain point, with all this growth, I begin to notice the job crashing and restarting (with checkpoints failing).
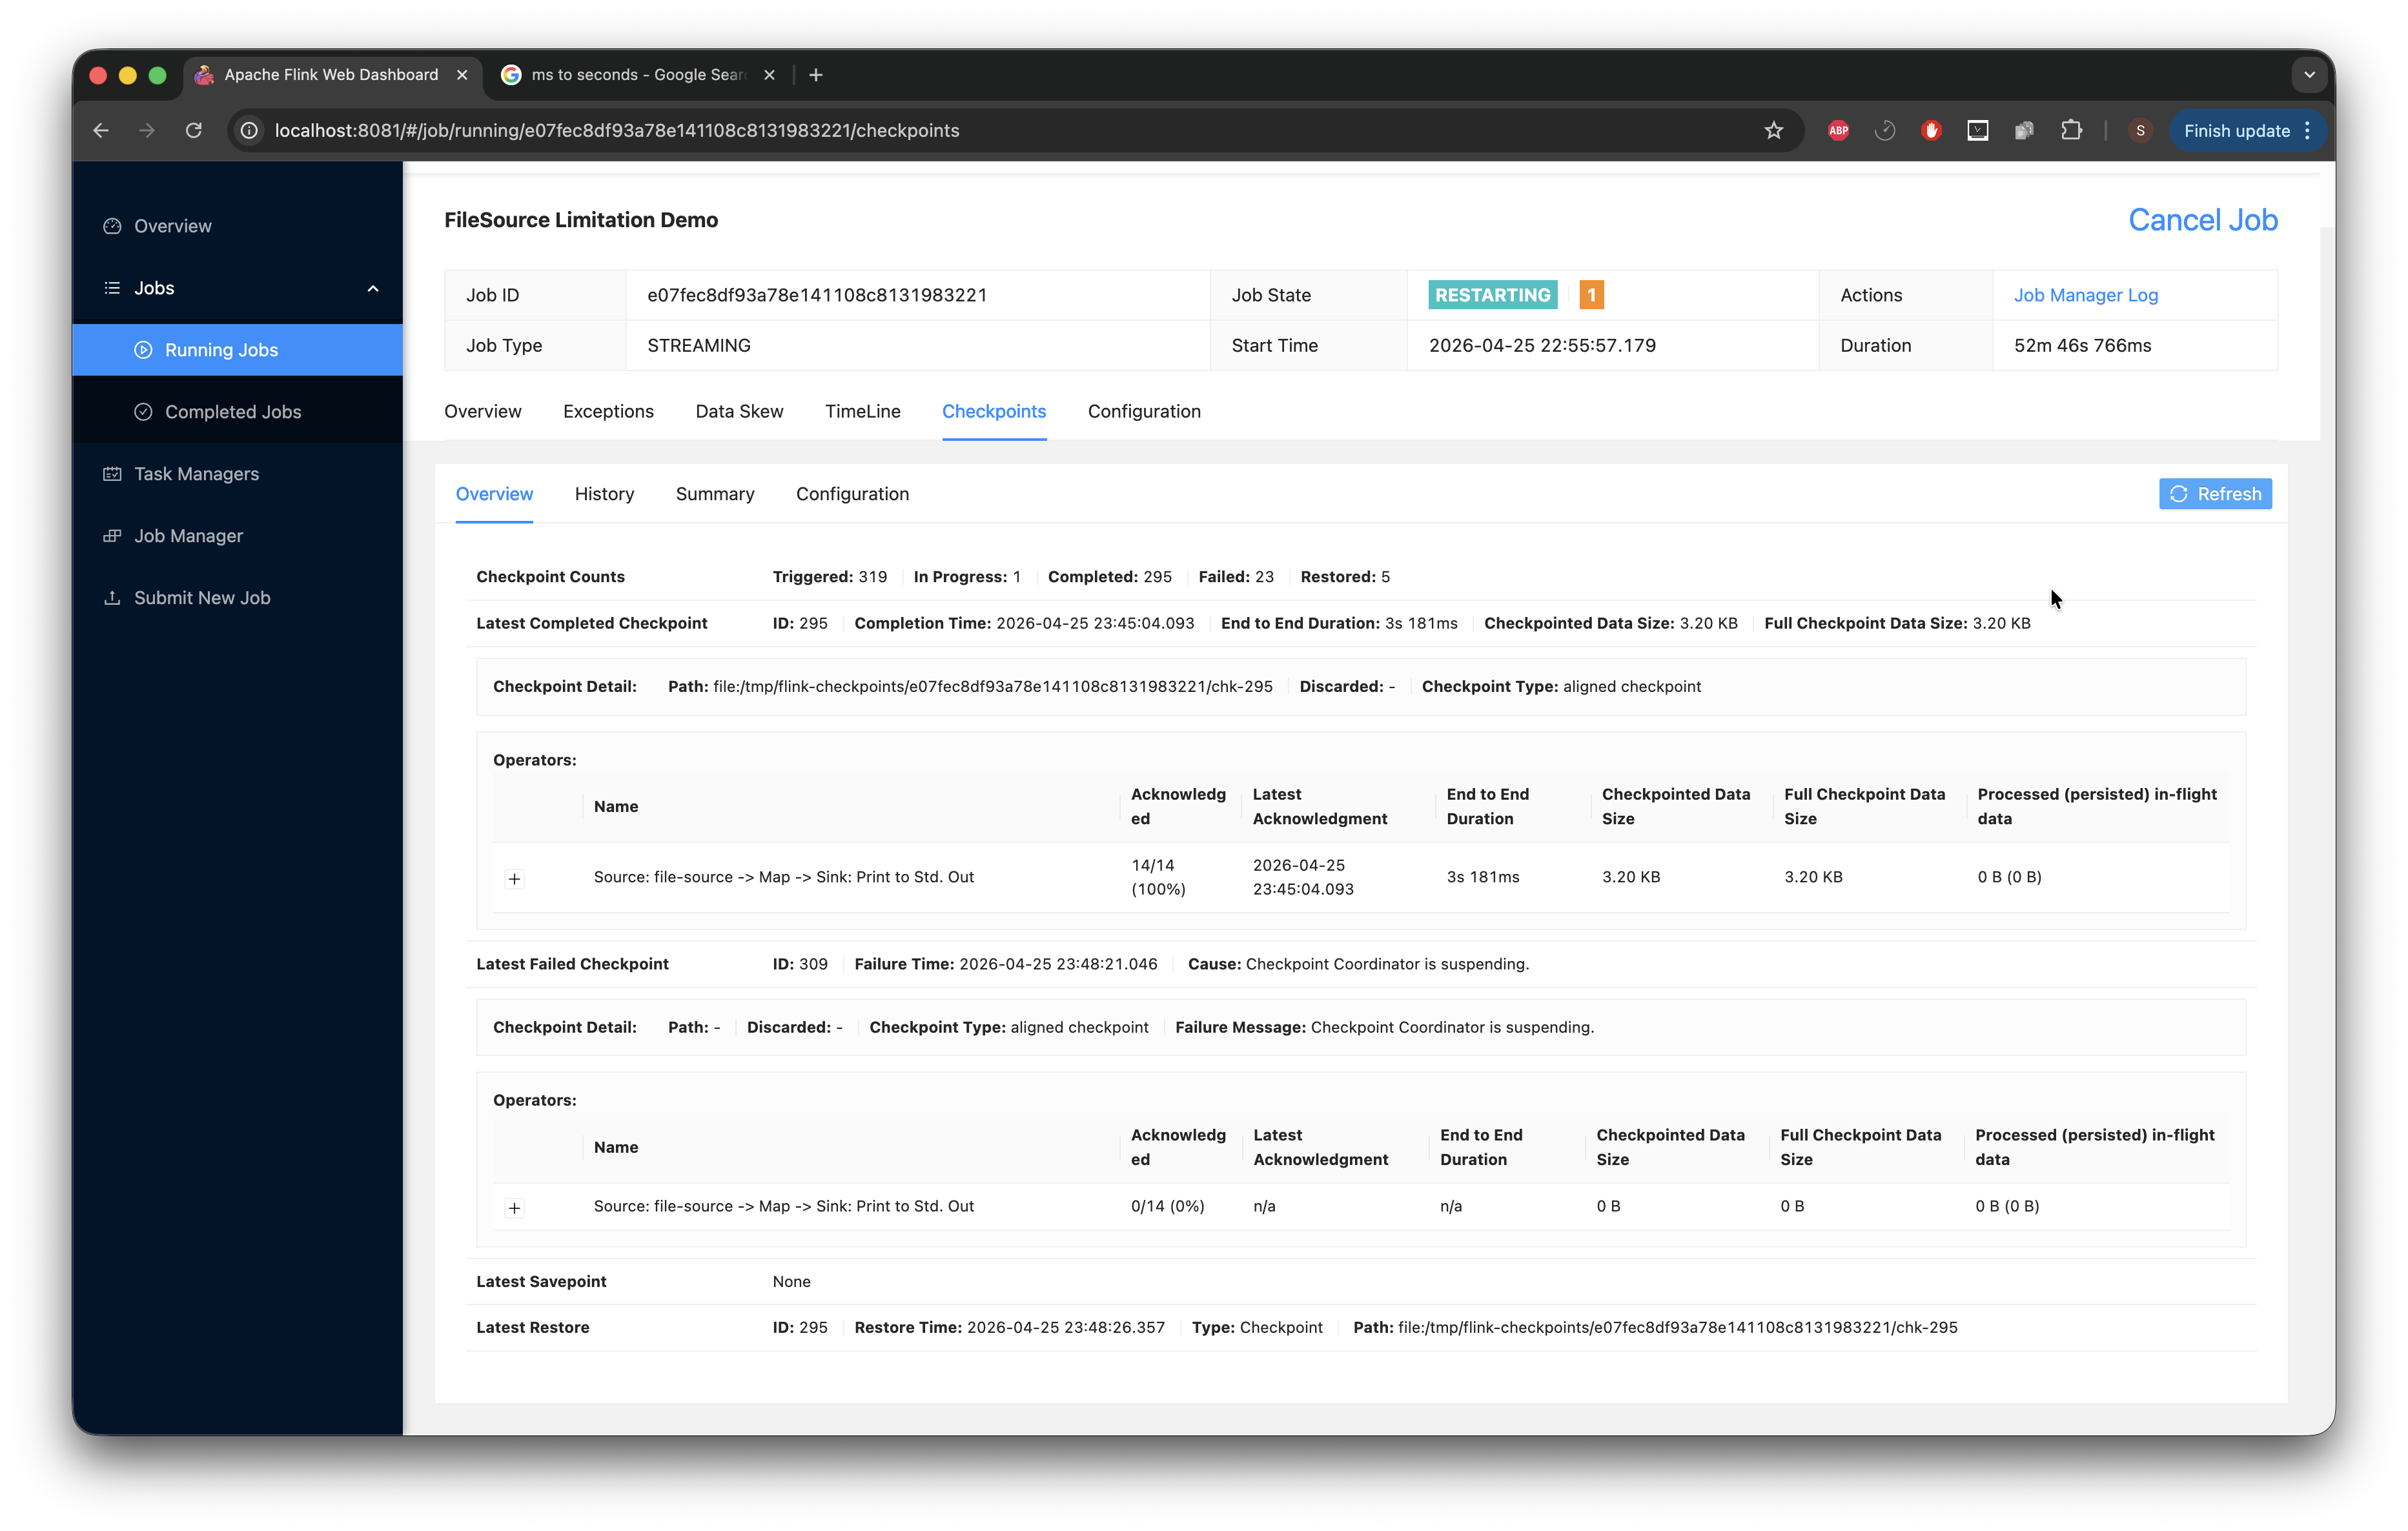
What we see happening: the enumerator was accumulating every file path it discovered into an in-memory list. At every checkpoint, that entire list was serialized and written into the _metadata file. We proved this by looking at the file on disk: it grew from 2.8 MB to 79 MB to 226 MB at some point. We ran strings on it and saw 1,843,535 individual file paths inside.
With the timeout being 10 seconds, the enumerator's state had grown so large that serializing it couldn't be completed within the deadline. Checkpoints started timing out, and after 3 consecutive failures (our configured tolerance), Flink restarted the job. On restart, it restored from the last successful checkpoint, which already had a massive enumerator state. The enumerator then discovered even more new files that landed during the failure period, making the state bigger. The next checkpoint attempt was even larger and failed even faster. This ordeal caused the job to enter a spiral of restarts and failed tasks.
Step 3: Decide on a solution path
With the problem reproduced and the failure mode understood, the next thing to figure out is the direction of the fix. I plan to develop two solutions and compare them. I'm not sure yet what that comparison will be based on, but having both side by side should make the trade-offs clearer.
Option 1: TTL on the processed-path set. Evict expired processed paths via a TTL policy, bounding the enumerator's state by time rather than by file count. I want this to be opt-in so existing users see no behavior change. Concretely, in PendingSplitsCheckpoint, replace (or add alongside) the existing Collection<Path> alreadyProcessedPaths with a new field that pairs each path with a long timestamp, something like alreadyProcessedPathAndTimestamp.
Option 2: A time-based watermark. Instead of remembering paths at all, remember a single long, the highest modification timestamp processed so far. On each rescan, ignore any file with xtime <= watermark. This is the most aggressive form of state compression: one number, regardless of how many files have been processed.
Step 4: Pull down the Flink codebase and start prototyping
With the two paths sketched out, the next move is to pull down the Flink codebase, find my way around the relevant classes, and start testing both options against the reproduction setup from Step 2.